workmux
git worktrees + tmux windows for zero-friction parallel dev
![]()
Parallel development in tmux* with git worktrees
📖 Documentation · Install · Quick start · Commands · Changelog
Giga opinionated zero-friction workflow tool for managing
git worktrees and tmux windows as
isolated development environments. Perfect for running multiple AI agents in
parallel without conflict.
Philosophy: Build on tools you already use. tmux/zellij/kitty/etc. for
windowing, git for worktrees, your agent for coding - workmux ties them together.
* Also supports
kitty,
WezTerm, and
Zellij as alternative
backends.
📖 New to workmux? Read the
introduction blog post for a
quick overview.
[!TIP]
consult-llm pairs naturally with
workmux: let your agents consult another AI model to plan architecture,
review changes, debate approaches, or get unstuck on tricky bugs without
leaving the worktree.See How to orchestrate large coding tasks without context bloat
for a workflow that combines workmux and consult-llm.
Why workmux?
Parallel workflows. Work on multiple features the same time, each with its
own AI agent. No stashing, no branch switching, no conflicts.
One window per task. A natural mental model. Each has its own terminal
state, editor session, dev server, and AI agent. Context switching is switching
tabs.
Automated setup. New worktrees start broken (no .env, no node_modules,
no dev server). workmux can copy config files, symlink dependencies, and run
install commands on creation.
One-command cleanup. workmux merge handles the full lifecycle: merge the
branch, delete the worktree, close the tmux window, remove the local branch.
Terminal workflow. Build on your terminal setup instead of yet another
agentic GUI that won’t exist next year. If you don’t have one yet, tmux might be
worth picking up.
New to worktrees? See Why git worktrees?
Features
- Create git worktrees with matching tmux windows in a single command (
add) - Merge branches and clean up everything (worktree, tmux window, branches) in
one command (merge) - Dashboard for monitoring agents, reviewing changes, and
sending commands - Sidebar for a persistent,
at-a-glance view of all agents across tmux windows - Delegate tasks to worktree agents with the
/worktreeskill - Display agent status in tmux window names
- Automatically set up your preferred tmux pane layout (editor, shell, watchers,
etc.) - Run post-creation hooks (install dependencies, setup database, etc.)
- Copy or symlink configuration files (
.env,node_modules) into new
worktrees - Sandbox agents in containers or VMs for enhanced security
- Automatic branch name generation from
prompts using LLM - Shell completions
Hype
“I’ve been using (and loving) workmux which brings together tmux, git
worktrees, and CLI agents into an opinionated workflow.”
— @Coolin96 🔗
“Thank you so much for your work with workmux! It’s a tool I’ve been wanting
to exist for a long time.”
— @rstacruz 🔗
“It’s become my daily driver - the perfect level of abstraction over tmux +
git, without getting in the way or obscuring the underlying tooling.”
— @cisaacstern 🔗
“I have to mention workmux at every opportunity because it’s the perfect glue
between worktrees, agents and tmux windows.”
— @dedbrizz 🔗
Installation
Bash YOLO
curl -fsSL https://raw.githubusercontent.com/raine/workmux/main/scripts/install.sh | bash
Homebrew (macOS/Linux)
brew install raine/workmux/workmux
Other methods (Cargo, mise, Nix)
Cargo (requires rustup):
cargo install workmux
mise:
mise use -g cargo:raine/workmux
Nix (flake and home-manager setup):
nix profile install github:raine/workmux
For manual installation, see
pre-built binaries.
Quick start
[!NOTE]
workmux requires a terminal multiplexer. Make sure you have
tmux (or
WezTerm /
Kitty /
Zellij) installed and running
before you start. See My tmux setup
if you need a starting point.
-
Initialize configuration (optional):
workmux initThis creates a
.workmux.yamlfile to customize your workflow (pane layouts,
setup commands, file operations, etc.). workmux works out of the box with
sensible defaults, so this step is optional. -
Create a new worktree and tmux window:
workmux add new-featureThis will:
- Create a git worktree at
<project_root>/../<project_name>__worktrees/new-feature - Copy config files and symlink dependencies (if
configured) - Run any
post_createsetup commands - Create a tmux window named
wm-new-feature(the prefix is configurable) - Set up your configured or the default tmux pane layout
- Automatically switch your tmux client to the new window
- Create a git worktree at
-
Do your thing
-
Finish and clean up
Local merge: Run
workmux mergeto merge into the base branch and clean
up in one step.PR workflow: Push and open a PR. After it’s merged, run
workmux remove
to clean up.
Configuration
workmux uses a two-level configuration system:
- Global (
~/.config/workmux/config.yaml): Personal defaults for all
projects - Project (
.workmux.yaml): Project-specific overrides
Project settings override global settings. When you run workmux from a
subdirectory, it walks upward to find the nearest .workmux.yaml, allowing
nested configs for monorepos. See the
Monorepos guide
for details. For post_create and file operation lists (files.copy,
files.symlink), you can use "<global>" to include global values alongside
project-specific ones. Other settings like panes are replaced entirely when
defined in the project config.
Global configuration example
~/.config/workmux/config.yaml:
nerdfont: true # Enable nerdfont icons (prompted on first run)
merge_strategy: rebase # Make workmux merge do rebase by default
agent: claude

panes:
  - command: <agent> # Start the configured agent (e.g., claude)
    focus: true
  - split: horizontal # Second pane with default shell
Project configuration example
.workmux.yaml:
post_create:
  - '<global>'
  - mise use

files:
  symlink:
    - '<global>' # Include global symlinks (node_modules)
    - .pnpm-store # Add project-specific symlink

panes:
  - command: pnpm install
    focus: true
  - command: <agent>
    split: horizontal
  - command: pnpm run dev
    split: vertical
For a real-world example, see
workmux’s own .workmux.yaml.
Configuration options
Most options have sensible defaults. You only need to configure what you want to
customize.
Basic options
| Option | Description | Default |
|---|---|---|
main_branch |
Branch to merge into | Auto-detected |
base_branch |
Default base branch for new worktrees | Current branch |
worktree_dir |
Directory for worktrees (absolute or relative). Supports ~ and {project}. |
<project>__worktrees/ |
window_prefix |
Prefix for tmux window/session names | wm- |
mode |
Tmux mode (window or session) |
window |
agent |
Default agent for <agent> placeholder |
claude |
agents |
Named agent commands (docs, global-only) | {} |
merge_strategy |
Default merge strategy (merge, rebase, squash) |
merge |
theme |
Dashboard color scheme (custom colors) | default (auto dark/light) |
Naming options
| Option | Description | Default |
|---|---|---|
worktree_naming |
How to derive names from branches | full |
worktree_prefix |
Prefix for worktree directories and windows | none |
worktree_naming strategies:
full: Use the full branch name (slashes become dashes)basename: Use only the part after the last/(e.g.,prj-123/feature→
feature)
Panes
Define your tmux pane layout with the panes array. For multiple windows in
session mode, use windows instead (they are
mutually exclusive).
panes:
  - command: <agent>
    focus: true
  - command: npm run dev
    split: horizontal
    size: 15
Each pane supports:
| Option | Description | Default |
|---|---|---|
command |
Command to run (see agent placeholders) | Shell |
focus |
Whether this pane receives focus | false |
zoom |
Zoom pane to fullscreen (implies focus: true) |
false |
split |
Split direction (horizontal or vertical) |
— |
size |
Absolute size in lines/cells | 50% |
percentage |
Size as percentage (1-100) | 50% |
Agent placeholders
<agent>: resolves to the configured agent (fromagentconfig or--agent
flag)
Built-in agents (claude, gemini, codex, opencode, kiro-cli, vibe,
pi) are auto-detected when used as literal commands and receive prompt
injection automatically, without needing the <agent> placeholder or a matching
agent config:
panes:
  - command: 'claude --dangerously-skip-permissions'
    focus: true
  - command: 'codex --yolo'
    split: vertical
Each agent receives the prompt (via -p/-P/-e) using the correct format for
that agent. Auto-detection matches the executable name regardless of flags or
path.
Named layouts
Define reusable pane arrangements in the layouts map and select one at
add-time with -l/--layout:
layouts:
  design:
    panes:
      - command: <agent>
        focus: true
      - command: <agent:codex>
        split: vertical
  review:
    panes:
      - command: <agent>
workmux add my-feature -l design
When -l is used, the layout’s panes replace the top-level panes for that
worktree. All other config (hooks, files, agent, etc.) comes from the top-level
as usual. The -l flag cannot be combined with --agent.
File operations
New worktrees are clean checkouts with no gitignored files (.env,
node_modules, etc.). Use files to automatically copy or symlink what each
worktree needs:
files:
  copy:
    - .env
  symlink:
    - .next/cache # Share build cache across worktrees
Both copy and symlink accept glob patterns.
To re-apply file operations to an existing worktree (e.g., after updating the
config), run workmux sync-files from inside the worktree. Use --all to sync
all worktrees at once.
Lifecycle hooks
Run commands at specific points in the worktree lifecycle, such as installing
dependencies or running database migrations. All hooks run with the worktree
directory as the working directory (or the nested config directory for
nested configs)
and receive environment variables: WM_HANDLE, WM_WORKTREE_PATH,
WM_PROJECT_ROOT, WM_CONFIG_DIR.
WM_CONFIG_DIR points to the directory containing the .workmux.yaml that was
used, which may differ from WM_WORKTREE_PATH when using nested configs.
| Hook | When it runs | Additional env vars |
|---|---|---|
post_create |
After worktree creation, before tmux window opens | — |
pre_merge |
Before merging (aborts on failure) | WM_BRANCH_NAME, WM_TARGET_BRANCH |
pre_remove |
Before worktree removal (aborts on failure) | — |
Example:
post_create:
  - direnv allow

pre_merge:
  - just check
Agent status icons
Customize the icons shown in tmux window names:
status_icons:
  working: '🤖' # Agent is processing
  waiting: '💬' # Agent needs input (auto-clears on focus)
  done: '✅' # Agent finished (auto-clears on focus)
Agents in “working” status that produce no pane output for 10 seconds are
automatically detected as interrupted.
Set status_format: false to disable automatic tmux format modification
Default behavior
- Worktrees are created in
<project>__worktreesas a sibling directory to your
project by default - If no
panesconfiguration is defined, workmux provides opinionated defaults:- For projects with a
CLAUDE.mdfile: Opens the configured agent (see
agentoption) in the first pane, defaulting toclaudeif none is set. - For all other projects: Opens your default shell.
- Both configurations include a second pane split horizontally
- For projects with a
post_createcommands are optional and only run if you configure them
Automatic setup with panes
Use the panes configuration to automate environment setup. Unlike
post_create hooks which must finish before the tmux window opens, pane
commands execute immediately within the new window.
This can be used for:
- Installing dependencies: Run
npm installorcargo buildin a focused
pane to monitor progress. - Starting services: Launch dev servers, database containers, or file
watchers automatically. - Running agents: Initialize AI agents with specific context.
Since these run in standard tmux panes, you can interact with them (check logs,
restart servers) just like a normal terminal session.
Running dependency installation (like pnpm install) in a pane command rather
than post_create has a key advantage: you get immediate access to the tmux
window while installation runs in the background. With post_create, you’d have
to wait for the install to complete before the window even opens. This also
means AI agents can start working immediately in their pane while dependencies
install in parallel.
panes:
  # Pane 1: Install dependencies, then start dev server
  - command: pnpm install && pnpm run dev

  # Pane 2: AI agent
  - command: <agent>
    split: horizontal
    focus: true
Directory structure
Here’s how workmux organizes your worktrees by default:
~/projects/
├── my-project/               <-- Main project directory
│   ├── src/
│   ├── package.json
│   └── .workmux.yaml
│
└── my-project__worktrees/    <-- Worktrees created by workmux
    ├── feature-A/            <-- Isolated workspace for 'feature-A' branch
    │   ├── src/
    │   └── package.json
    │
    └── bugfix-B/             <-- Isolated workspace for 'bugfix-B' branch
        ├── src/
        └── package.json
Each worktree is a separate working directory for a different branch, all
sharing the same git repository. This allows you to work on multiple branches
simultaneously without conflicts.
You can customize the worktree directory location using the worktree_dir
configuration option (see Configuration options).
The value supports ~ for the home directory and a {project} placeholder
that resolves to the main worktree’s directory name. This lets a single
global config namespace every repo’s worktrees under one root, e.g.
worktree_dir: ~/.workmux/{project}.
Shell alias (recommended)
For faster typing, alias workmux to wm:
alias wm='workmux'
Commands
add- Create a new worktree and tmux windowmerge- Merge a branch and clean up everythingremove- Remove worktrees without merginglist- List all worktrees with statusopen- Open a tmux window for an existing worktreeclose- Close a worktree’s tmux window (keeps
worktree)resurrect- Restore worktree windows after a crashpath- Get the filesystem path of a worktreedashboard- Show TUI dashboard of all active agentssidebar- Toggle a compact agent status sidebar in tmuxconfig edit- Edit the global configuration fileinit- Generate configuration filesandbox- Manage sandbox backends (container/Lima)claude prune- Clean up stale Claude Code entriescompletions- Generate shell completionsdocs- Show detailed documentation
workmux add <branch-name>
Creates a new git worktree with a matching tmux window and switches you to it
immediately. If the branch doesn’t exist, it will be created automatically.
<branch-name>: Name of the branch to create or switch to, a remote branch
reference (e.g.,origin/feature-branch), or a GitHub fork reference (e.g.,
user:branch). Remote and fork references are automatically fetched and
create a local branch with the derived name. Fork references derive the local
branch asuser-branch(e.g.,someuser:featurecreates local branch
someuser-feature). Optional when using--pr.
Options
--base <branch|commit|tag>: Specify a base branch, commit, or tag to branch
from when creating a new branch. Overridesbase_branchconfig. Defaults to
base_branchfrom config, then the currently checked out branch.--pr <number>: Checkout a GitHub pull request by its number into a new
worktree.- Requires the
ghcommand-line tool to be installed and authenticated. - The local branch name defaults to the PR’s head branch name, but can be
overridden (e.g.,workmux add custom-name --pr 123). - If that local branch already exists and has no worktree, it is reused.
- Requires the
-A, --auto-name: Generate branch name from prompt using LLM. See
Automatic branch name generation.--name <name>: Override the worktree directory and tmux window name. By
default, these are derived from the branch name (slugified). Cannot be used
with multi-worktree generation (--count,--foreach, or multiple
--agent).-b, --background: Create the tmux window in the background without switching
to it. Useful with--prompt-editor.-w, --with-changes: Move uncommitted changes from the current worktree to
the new worktree, then reset the original worktree to a clean state. Useful
when you’ve started working on main and want to move your branches to a new
worktree.--patch: Interactively select which changes to move (requires
--with-changes). Opens an interactive prompt for selecting hunks to stash.-u, --include-untracked: Also move untracked files (requires
--with-changes). By default, only staged and modified tracked files are
moved.-p, --prompt <text>: Provide an inline prompt that will be automatically
passed to AI agent panes.-P, --prompt-file <path>: Provide a path to a file whose contents will be
used as the prompt.-e, --prompt-editor: Open your$EDITOR(or$VISUAL) to write the prompt
interactively.--prompt-file-only: Write the prompt file to the worktree without injecting
it into agent commands. No agent pane is required. Useful when your editor has
an embedded agent that reads.workmux/PROMPT-*.mddirectly.-l, --layout <name>: Use a named pane layout from config instead of the
default panes. Cannot be combined with--agent.-a, --agent <name>: The agent(s) to use for the worktree(s). Can be
specified multiple times to generate a worktree for each agent. Overrides the
agentfrom your config file.-W, --wait: Block until the created tmux window is closed. Useful for
scripting when you want to wait for an agent to complete its work. The agent
can signal completion by runningworkmux remove --keep-branch.-o, --open-if-exists: If a worktree for the branch already exists, open it
instead of failing. Similar totmux new-session -A. Useful when you don’t
know or care whether the worktree already exists.-s, --session: Create a tmux session instead of a window. See
Session mode for details.--config <path>: Use an alternate config file for this invocation. Still
merges with global config.--fork: Fork the last conversation from the current worktree into the new
one. The agent resumes with the forked conversation context. Use
--fork=<session-id>to fork a specific session (prefix matching supported).
Currently supports Claude Code.
Skip options
These options allow you to skip expensive setup steps when they’re not needed
(e.g., for documentation-only changes):
-H, --no-hooks: Skip runningpost_createcommands-F, --no-file-ops: Skip file copy/symlink operations (e.g., skip linking
node_modules)-C, --no-pane-cmds: Skip executing pane commands (panes open with plain
shells instead)
What happens
- Determines the handle for the worktree by slugifying the branch name
(e.g.,feature/authbecomesfeature-auth). This can be overridden with
the--nameflag. - Creates a git worktree at
<worktree_dir>/<handle>(theworktree_diris
configurable and defaults to a sibling directory of your project) - Runs any configured file operations (copy/symlink)
- Executes
post_createcommands if defined (runs before the tmux window
opens, so keep them fast) - Creates a new tmux window named
<window_prefix><handle>(e.g.,
wm-feature-authwithwindow_prefix: wm-) - Sets up your configured tmux pane layout
- Automatically switches your tmux client to the new window
Examples
Basic usage
# Create a new branch and worktree
workmux add user-auth

# Use an existing branch
workmux add existing-work

# Create a new branch from a specific base
workmux add hotfix --base production

# Create a worktree from a remote branch (creates local branch "user-auth-pr")
workmux add origin/user-auth-pr

# Remote branches with slashes work too (creates local branch "feature/foo")
workmux add origin/feature/foo

# Create a worktree in the background without switching to it
workmux add feature/parallel-task --background

# Use a custom name for the worktree directory and tmux window
workmux add feature/long-descriptive-branch-name --name short

# Open existing worktree if it exists, create if it doesn't (idempotent)
workmux add my-feature -o
Checking out pull requests and fork branches
# Checkout PR #123. The local branch will be named after the PR's branch.
workmux add --pr 123

# Checkout PR #456 with a custom local branch name
workmux add fix/api-bug --pr 456

# Checkout a fork branch using GitHub's owner:branch format (copy from GitHub UI)
# Creates local branch "someuser-feature-branch" tracking the fork
workmux add someuser:feature-branch
Moving changes to a new worktree
# Move uncommitted changes to a new worktree (including untracked files)
workmux add feature/new-thing --with-changes -u

# Move only staged/modified files (not untracked files)
workmux add fix/bug --with-changes

# Interactively select which changes to move
workmux add feature/partial --with-changes --patch
AI agent prompts
# Create a worktree with an inline prompt for AI agents
workmux add feature/ai --prompt "Implement user authentication with OAuth"

# Override the default agent for a specific worktree
workmux add feature/testing -a gemini

# Create a worktree with a prompt from a file
workmux add feature/refactor --prompt-file task-description.md

# Open your editor to write a prompt interactively
workmux add feature/new-api --prompt-editor

# Write prompt file only (for editors with embedded agents like neovim)
workmux add feature/task -P task.md --prompt-file-only
Skipping setup steps
# Skip expensive setup for documentation-only changes
workmux add docs-update --no-hooks --no-file-ops --no-pane-cmds

# Skip just the file operations (e.g., you don't need node_modules)
workmux add quick-fix --no-file-ops
Scripting with --wait
# Block until the agent completes and closes the window
workmux add feature/api --wait -p "Implement the REST API, then run: workmux remove --keep-branch"

# Use in a script to run sequential agent tasks
for task in task1.md task2.md task3.md; do
  workmux add "task-$(basename $task .md)" --wait -P "$task"
done
AI agent integration
When you provide a prompt via --prompt, --prompt-file, or --prompt-editor,
workmux automatically injects the prompt into panes running the configured agent
command (e.g., claude, codex, opencode, gemini, kiro-cli, vibe,
pi, or whatever you’ve set via the agent config or --agent flag) without
requiring any .workmux.yaml changes:
- Panes with a command matching the configured agent are automatically started
with the given prompt. - You can keep your
.workmux.yamlpane configuration simple (e.g.,
panes: [{ command: "<agent>" }]) and let workmux handle prompt injection at
runtime.
This means you can launch AI agents with task-specific prompts without modifying
your project configuration for each task.
If your editor has an embedded agent (e.g., neovim with an agent plugin), use
--prompt-file-only to write the prompt to .workmux/PROMPT-<branch>.md
without requiring an agent pane. Your editor can then detect and consume the
file on startup. This can also be set permanently in config with
prompt_file_only: true.
Automatic branch name generation
The --auto-name (-A) flag generates a branch name from your prompt using an
LLM. The tool used depends on your configuration:
auto_name.commandis set: uses that command as-isconfig.agentis a known agent (claude,gemini,codex,opencode,
kiro-cli,vibe,pi): uses the agent’s CLI with a fast/cheap model- Neither: falls back to the
llmCLI tool
Usage
# Opens editor for prompt, generates branch name
workmux add -A

# With inline prompt
workmux add -A -p "Add OAuth authentication"

# With prompt file
workmux add -A -P task-spec.md
Requirements
When agent is configured (e.g., agent: claude), workmux automatically uses
that agent’s CLI for branch naming. No additional setup is required beyond
having the agent installed.
If no agent is configured and no auto_name.command is set, workmux uses the
llm CLI tool:
pipx install llm
Configure a model (e.g., OpenAI):
llm keys set openai
# Or use a local model
llm install llm-ollama
If you set auto_name.command, llm is not required.
Agent profile defaults
When an agent is configured, these commands are used automatically:
| Agent | Auto-name command |
|---|---|
claude |
claude --model haiku -p |
gemini |
gemini -m gemini-2.5-flash-lite -p |
codex |
codex exec --config model_reasoning_effort="low" -m gpt-5.1-codex-mini |
opencode |
opencode run |
kiro-cli |
kiro-cli chat --no-interactive |
pi |
pi -p |
To override back to llm when an agent is configured, set
auto_name.command: "llm".
Configuration
Optionally configure auto-name behavior in .workmux.yaml:
auto_name:
  model: 'gemini-2.5-flash-lite'
  background: true # Always run in background when using --auto-name
  system_prompt: |
    Generate a concise git branch name based on the task description.

    Rules:
    - Use kebab-case (lowercase with hyphens)
    - Keep it short: 1-3 words, max 4 if necessary
    - Focus on the core task/feature, not implementation details
    - No prefixes like feat/, fix/, chore/

    Examples of good branch names:
    - "Add dark mode toggle" → dark-mode
    - "Fix the search results not showing" → fix-search
    - "Refactor the authentication module" → auth-refactor
    - "Add CSV export to reports" → export-csv
    - "Shell completion is broken" → shell-completion

    Output ONLY the branch name, nothing else.
To use a specific tool, set auto_name.command. The command string is split
into program and arguments, and the composed prompt is piped via stdin.
auto_name:
  command: 'claude -p'

# Force llm even when an agent is configured
auto_name:
  command: 'llm'
| Option | Description | Default |
|---|---|---|
command |
Command for branch name generation (overrides agent profile) | Agent profile or llm CLI |
model |
LLM model to use with the llm CLI (ignored when command set) |
llm’s default |
background |
Always run in background when using --auto-name |
false |
system_prompt |
Custom system prompt for branch name generation | Built-in prompt |
Recommended models for fast, cheap branch name generation (with llm):
gemini-2.5-flash-lite(recommended)gpt-5-nano
Parallel workflows & multi-worktree generation
workmux can generate multiple worktrees from a single add command, which is
ideal for running parallel experiments or delegating tasks to multiple AI
agents. This is controlled by four mutually exclusive modes:
- (
-a,--agent): Create a worktree for each specified agent. - (
-n,--count): Create a specific number of worktrees. - (
--foreach): Create worktrees based on a matrix of variables. - stdin: Pipe input lines to create worktrees with templated prompts.
When using any of these modes, branch names are generated from a template, and
prompts are templated with variables. Single-worktree prompts are passed through
literally, so common syntax like GitHub Actions ${{ ... }} does not need to be
escaped.
Multi-worktree options
-a, --agent <name>: When used multiple times, creates one worktree for each
agent.-n, --count <number>: Creates<number>worktree instances. Can be combined
with a single--agentflag to apply that agent to all instances.--foreach <matrix>: Creates worktrees from a variable matrix string. The
format is"var1:valA,valB;var2:valX,valY". All value lists must have the
same length. Values are paired by index position (zip, not Cartesian product):
the first value of each variable goes together, the second with the second,
etc.--branch-template <template>: A
MiniJinja (Jinja2-compatible)
template for generating branch names.- Available variables:
{{ base_name }},{{ agent }},{{ num }},
{{ index }},{{ input }}(stdin), and any variables from--foreach. - Default:
{{ base_name }}{% if agent %}-{{ agent | slugify }}{% endif %}{% for key, value in foreach_vars %}-{{ value | slugify }}{% endfor %}{% if num %}-{{ num }}{% endif %}
- Available variables:
--max-concurrent <number>: Limits how many worktrees run simultaneously.
When set, workmux creates up to<number>worktrees, then waits for any
window to close before starting the next. Requires agents to close windows
when done (e.g., via prompt instruction to run
workmux remove --keep-branch).
Prompt templating
When generating multiple worktrees, any prompt provided via -p, -P, or -e
is treated as a MiniJinja template. You can use variables from your generation
mode to create unique prompts for each agent or instance. For ordinary
single-worktree add commands, prompt text is not templated.
Variable matrices in prompt files
Instead of passing --foreach on the command line, you can specify the variable
matrix directly in your prompt file using YAML frontmatter. This is more
convenient for complex matrices and keeps the variables close to the prompt that
uses them.
Format:
Create a prompt file with YAML frontmatter at the top, separated by ---:
Example 1: mobile-task.md
---
foreach:
  platform: [iOS, Android]
  lang: [swift, kotlin]
---

Build a {{ platform }} app using {{ lang }}. Implement user authentication and
data persistence.
workmux add mobile-app --prompt-file mobile-task.md
# Generates worktrees: mobile-app-ios-swift, mobile-app-android-kotlin
Example 2: agent-task.md (using agent as a foreach variable)
---
foreach:
  agent: [claude, gemini]
---

Implement the dashboard refactor using your preferred approach.
workmux add refactor --prompt-file agent-task.md
# Generates worktrees: refactor-claude, refactor-gemini
Behavior:
- Variables from the frontmatter are available in both the prompt template and
the branch name template - All value lists must have the same length, and values are paired by index
position (same zip behavior as--foreach) - CLI
--foreachoverrides frontmatter with a warning if both are present - Works with both
--prompt-fileand--prompt-editor
Stdin input
You can pipe input lines to workmux add to create multiple worktrees. Each
line becomes available as the {{ input }} template variable in your prompt.
This is useful for batch-processing tasks from external sources.
Plain text: Each line becomes {{ input }}
echo -e "api\nauth\ndatabase" | workmux add refactor -P task.md
# {{ input }} = "api", "auth", "database"
JSON lines: Each key becomes a template variable
gh repo list --json url,name --jq -c '.[]' | workmux add analyze \
  --branch-template '{{ base_name }}-{{ name }}' \
  -P prompt.md
# Line: {"url":"https://github.com/raine/workmux","name":"workmux"}
# Variables: {{ url }}, {{ name }}, {{ input }} (raw JSON line)
This lets you structure data upstream with jq and use meaningful branch names
while keeping the full URL available in your prompt.
Behavior:
- Empty lines and whitespace-only lines are filtered out
- Stdin input cannot be combined with
--foreach(mutually exclusive) - JSON objects (lines starting with
{) are parsed and each key becomes a
variable {{ input }}always contains the raw line- If JSON contains an
inputkey, it overwrites the raw line value
Examples
# Create one worktree for claude and one for gemini with a focused prompt
workmux add my-feature -a claude -a gemini -p "Implement the new search API integration"
# Generates worktrees: my-feature-claude, my-feature-gemini

# Create 2 instances of the default agent
workmux add my-feature -n 2 -p "Implement task #{{ num }} in TASKS.md"
# Generates worktrees: my-feature-1, my-feature-2

# Create worktrees from a variable matrix
workmux add my-feature --foreach "platform:iOS,Android" -p "Build for {{ platform }}"
# Generates worktrees: my-feature-ios, my-feature-android

# Create agent-specific worktrees via --foreach
workmux add my-feature --foreach "agent:claude,gemini" -p "Implement the dashboard refactor"
# Generates worktrees: my-feature-claude, my-feature-gemini

# Use frontmatter in a prompt file for cleaner syntax
# task.md contains:
# ---
# foreach:
#   env: [staging, production]
#   task: [smoke-tests, integration-tests]
# ---
# Run {{ task }} against the {{ env }} environment
workmux add testing --prompt-file task.md
# Generates worktrees: testing-staging-smoke-tests, testing-production-integration-tests

# Pipe input from stdin to create worktrees
# review.md contains: Review the {{ input }} module for security issues.
echo -e "auth\npayments\napi" | workmux add review -A -P review.md
# Generates worktrees with LLM-generated branch names for each module
Recipe: Batch processing with worker pools
Combine stdin input, prompt templating, and concurrency limits to create a
worker pool that processes items from an external command.
Example: Generate test scaffolding for untested files
# generate-tests.md contains:
# Read the file at {{ input }} and generate a test suite covering
# the exported functions. Focus on happy path and edge cases.
# When done, run: workmux remove --keep-branch

find src/utils -name "*.ts" ! -name "*.test.ts" | \
  workmux add add-tests \
    --branch-template '{{ base_name }}-{{ index }}' \
    --prompt-file generate-tests.md \
    --max-concurrent 3 \
    --background
find ...lists files without tests (one per line) piped to stdin--branch-templateuses{{ index }}for unique branch names--prompt-fileuses{{ input }}to pass each file path to the agent--max-concurrent 3limits parallel agents to avoid rate limits--backgroundruns without switching focus
workmux merge [branch-name]
Merges a branch into a target branch (main by default) and automatically cleans
up all associated resources (worktree, tmux window, and local branch).
[!TIP]
mergevsremove: Usemergewhen you want to merge directly
without a pull request. If your workflow uses pull requests, use
removeto clean up after your PR is merged
on the remote.
[branch-name]: Optional name of the branch to merge. If omitted,
automatically detects the current branch from the worktree you’re in.
Options
--into <branch>: Merge into the specified branch instead of the main branch.
Useful for stacked PRs, git-flow workflows, or merging subtasks into a parent
feature branch. If the target branch has its own worktree, the merge happens
there; otherwise, the main worktree is used.--ignore-uncommitted: Commit any staged changes before merging without
opening an editor--keep,-k: Keep the worktree, window, and branch after merging (skip
cleanup). Useful when you want to verify the merge before cleaning up.--notification: Show a system notification on successful merge. Useful when
delegating merge to an AI agent and you want to be notified when it completes.
Merge strategies
By default, workmux merge performs a standard merge commit (configurable via
merge_strategy). You can override the configured behavior with these mutually
exclusive flags:
--rebase: Rebase the feature branch onto the target before merging (creates
a linear history via fast-forward merge). If conflicts occur, you’ll need to
resolve them manually in the worktree and rungit rebase --continue.--squash: Squash all commits from the feature branch into a single commit on
the target. You’ll be prompted to provide a commit message in your editor.
If you don’t want to have merge commits in your main branch, use the rebase
merge strategy, which does --rebase by default.
# ~/.config/workmux/config.yaml
merge_strategy: rebase
What happens
- Determines which branch to merge (specified branch or current branch if
omitted) - Determines the target branch (
--intoor main branch from config) - Checks for uncommitted changes (errors if found, unless
--ignore-uncommittedis used) - Commits staged changes if present (unless
--ignore-uncommittedis used) - Merges your branch into the target using the selected strategy (default:
merge commit) - Deletes the tmux window (including the one you’re currently in if you ran
this from a worktree) — skipped if--keepis used - Removes the worktree — skipped if
--keepis used - Deletes the local branch — skipped if
--keepis used
Typical workflow
When you’re done working in a worktree, simply run workmux merge from within
that worktree’s tmux window. The command will automatically detect which branch
you’re on, merge it into main, and close the current window as part of cleanup.
Examples
# Merge branch into main (default: merge commit)
workmux merge user-auth

# Merge the current worktree you're in
# (run this from within the worktree's tmux window)
workmux merge

# Rebase onto main before merging for a linear history
workmux merge user-auth --rebase

# Squash all commits into a single commit
workmux merge user-auth --squash

# Merge but keep the worktree/window/branch to verify before cleanup
workmux merge user-auth --keep
# ... verify the merge in main ...
workmux remove user-auth  # clean up later when ready

# Merge into a different branch (stacked PRs)
workmux merge feature/subtask --into feature/parent
workmux remove [name]... (alias: rm)
Removes worktrees, tmux windows, and branches without merging (unless you keep
the branches). Useful for abandoning work or cleaning up experimental branches.
Supports removing multiple worktrees in a single command.
[name]...: One or more worktree names (the directory names). Defaults to
current directory name if omitted.
Options
--all: Remove all worktrees at once (except the main worktree). Prompts for
confirmation unless--forceis used. Safely skips worktrees with uncommitted
changes or unmerged commits.--gone: Remove worktrees whose upstream remote branch has been deleted
(e.g., after a PR is merged on GitHub). Automatically runsgit fetch --prune
first.--force,-f: Skip confirmation prompt and ignore uncommitted changes--keep-branch,-k: Remove only the worktree and tmux window while keeping
the local branch
Examples
# Remove the current worktree (run from within the worktree)
workmux remove

# Remove a specific worktree with confirmation if unmerged
workmux remove experiment

# Remove multiple worktrees at once
workmux rm feature-a feature-b feature-c

# Remove multiple worktrees with force (no confirmation)
workmux rm -f old-work stale-branch

# Use the alias
workmux rm old-work

# Remove worktree/window but keep the branch
workmux remove --keep-branch experiment

# Force remove without prompts
workmux rm -f experiment

# Remove worktrees whose remote branches were deleted (e.g., after PR merge)
workmux rm --gone

# Force remove all gone worktrees (no confirmation)
workmux rm --gone -f

# Remove all worktrees at once
workmux rm --all
workmux rename [old-name] <new-name>
Renames a worktree’s directory, its tmux window or session, and the per-worktree
workmux metadata. Optionally also renames the underlying git branch.
[old-name]: Optional current worktree name. Defaults to the current worktree
when run from inside one.<new-name>: The new handle (directory name and tmux window/session base name).
Options
--branch,-b: Also rename the underlying git branch to match<new-name>.
Fails if the worktree is on a detached HEAD.
Examples
# Rename a worktree from inside it
workmux rename feature-new

# Rename a specific worktree by name
workmux rename feature-old feature-new

# Also rename the branch to match
workmux rename feature-old feature-new --branch
Rename is non-destructive: uncommitted changes and untracked files are
preserved. The main worktree cannot be renamed. Collisions (existing target
path, existing tmux target, or existing branch) are rejected before any changes
are made.
workmux list (alias: ls)
Lists all git worktrees with their agent status, multiplexer window status, and
merge status. Supports filtering by worktree handle or branch name.
Arguments
[worktree-or-branch...]: Filter by worktree handle (directory name) or
branch name. Accepts multiple values. When omitted, shows all worktrees.
Options
--pr: Show GitHub PR status for each worktree. Requires theghCLI to be
installed and authenticated. Note that it shows pull requests’ statuses with
Nerd Font icons, which requires Nerd Font
compatible font installed.--json: Output as JSON. Produces a JSON array of objects with fields:
handle,branch,path,is_main,mode,has_uncommitted_changes,
is_open,created_at.
Examples
# List all worktrees
workmux list

# List with PR status
workmux list --pr

# Output as JSON for scripting
workmux list --json

# Filter to specific worktrees
workmux list my-feature
workmux list feature-auth feature-api
Example output
BRANCH      AGE  AGENT  MUX  UNMERGED  PATH
main        -    -      -    -         ~/project
user-auth   2h   🤖     ✓    -         ~/project__worktrees/user-auth
bug-fix     3d   ✅     ✓    ●         ~/project__worktrees/bug-fix
api-work    1w   -      ✓    -         ~/project__worktrees/api-work
Key
- AGE shows how old the worktree is (e.g.,
2h,3d,1w,2mo) - AGENT shows the current agent status (see
status tracking):🤖= working,💬= waiting for input,✅= finished- Multiple agents per worktree show a count (e.g.,
2🤖 1✅)
✓in MUX column = multiplexer window exists for this worktree●in UNMERGED column = branch has commits not merged into main-= not applicable
workmux config edit
Opens the global configuration file (~/.config/workmux/config.yaml) in your
preferred editor. Uses $VISUAL, $EDITOR, or falls back to vi. Creates the
file with commented-out defaults if it doesn’t exist yet.
workmux config path
Prints the path to the global configuration file. Useful for scripting.
workmux config reference
Prints the default configuration file with all options documented. Useful for
discovering available options or piping to an AI agent for context.
workmux init
Generates .workmux.yaml with example configuration and "<global>"
placeholder usage.
workmux open [name...]
Opens or switches to a tmux window for a pre-existing git worktree. If the
window already exists, switches to it. If not, creates a new window with the
configured pane layout and environment. Accepts multiple names to open several
worktrees at once.
[name...]: One or more worktree names (the directory name, which is also the
tmux window name without the prefix). Optional with--newwhen run from
inside a worktree.
Options
-n, --new: Force opening in a new window even if one already exists. Creates
a duplicate window with a suffix (e.g.,-2,-3). Useful for having
multiple terminal views into the same worktree.-s, --session: Open in session mode, overriding the stored mode. Persists
the mode change for subsequent opens. Cannot be combined with--new. Only
supported with tmux.--config <path>: Use an alternate config file for this invocation. Still
merges with global config.--run-hooks: Re-runs thepost_createcommands (these block window
creation).--force-files: Re-applies file copy/symlink operations. Useful for restoring
a deleted.envfile.-p, --prompt <text>: Provide an inline prompt for AI agent panes.-P, --prompt-file <path>: Provide a path to a file containing the prompt.-c, --continue: Resume the agent’s most recent conversation in this
worktree. Injects the appropriate flag for the configured agent (e.g.,
--continuefor Claude,--resumefor Gemini).-e, --prompt-editor: Open your editor to write the prompt interactively.--prompt-file-only: Write the prompt file without injecting it into agent
commands.
What happens
- Verifies that a worktree with
<name>exists. - If a tmux window exists and
--newis not set, switches to it. - Otherwise, creates a new tmux window (with suffix if duplicating).
- (If specified) Runs file operations and
post_createhooks. - Sets up your configured tmux pane layout.
- Automatically switches your tmux client to the new window.
Examples
# Open or switch to a window for an existing worktree
workmux open user-auth

# Force open a second window for the same worktree (creates user-auth-2)
workmux open user-auth --new

# Open a new window for the current worktree (run from within the worktree)
workmux open --new

# Open in session mode (converts from window mode if needed)
workmux open user-auth --session

# Resume the agent's last conversation
workmux open user-auth --continue

# Resume and send a follow-up prompt
workmux open user-auth --continue -p "Continue implementing the login flow"

# Open and re-run dependency installation
workmux open user-auth --run-hooks

# Open and restore configuration files
workmux open user-auth --force-files

# Open multiple worktrees at once
workmux open user-auth api-refactor bugfix-login
workmux close [name]
Closes the tmux window for a worktree without removing the worktree or branch.
This is useful when you want to temporarily close a window to reduce clutter or
free resources, but plan to return to the work later.
[name]: Optional worktree name (the directory name). Defaults to current
directory if omitted.
Examples
# Close the window for a specific worktree
workmux close user-auth

# Close the current worktree's window (run from within the worktree)
workmux close
To reopen the window later, use workmux open.
Tip: You can also use tmux’s native kill-window command (default:
prefix + &) to close a worktree’s window with the same effect.
workmux resurrect
Restores worktree windows after a tmux or computer crash. Uses persisted agent
state files to detect which worktrees had active agents before the crash, then
reopens them with --continue to resume agent conversations.
Options
--dry-run: Show what would be restored without doing it.
Examples
# See what would be restored after a crash
workmux resurrect --dry-run

# Restore all worktrees that had agents running
workmux resurrect
How it works
- Reads agent state files from
~/.local/state/workmux/agents/ - Matches each state file’s working directory to a git worktree in the current
repo - Skips worktrees that are already open or no longer exist
- Opens each matched worktree with
--continueto resume the agent
workmux sync-files
Re-applies file operations (copy and symlink from files config) to existing
worktrees. Useful when you add new entries to the files config or a symlink
was accidentally deleted.
Options
--all: Sync all worktrees instead of just the current one.
Examples
# Sync files to the current worktree
workmux sync-files

# Sync files to all worktrees
workmux sync-files --all
workmux path <name>
Prints the filesystem path of an existing worktree. Useful for scripting or
quickly navigating to a worktree directory.
<name>: Worktree name (the directory name).
Examples
# Get the path of a worktree
workmux path user-auth
# Output: /Users/you/project__worktrees/user-auth

# Use in scripts or with cd
cd "$(workmux path user-auth)"

# Copy a file to a worktree
cp config.json "$(workmux path feature-branch)/"
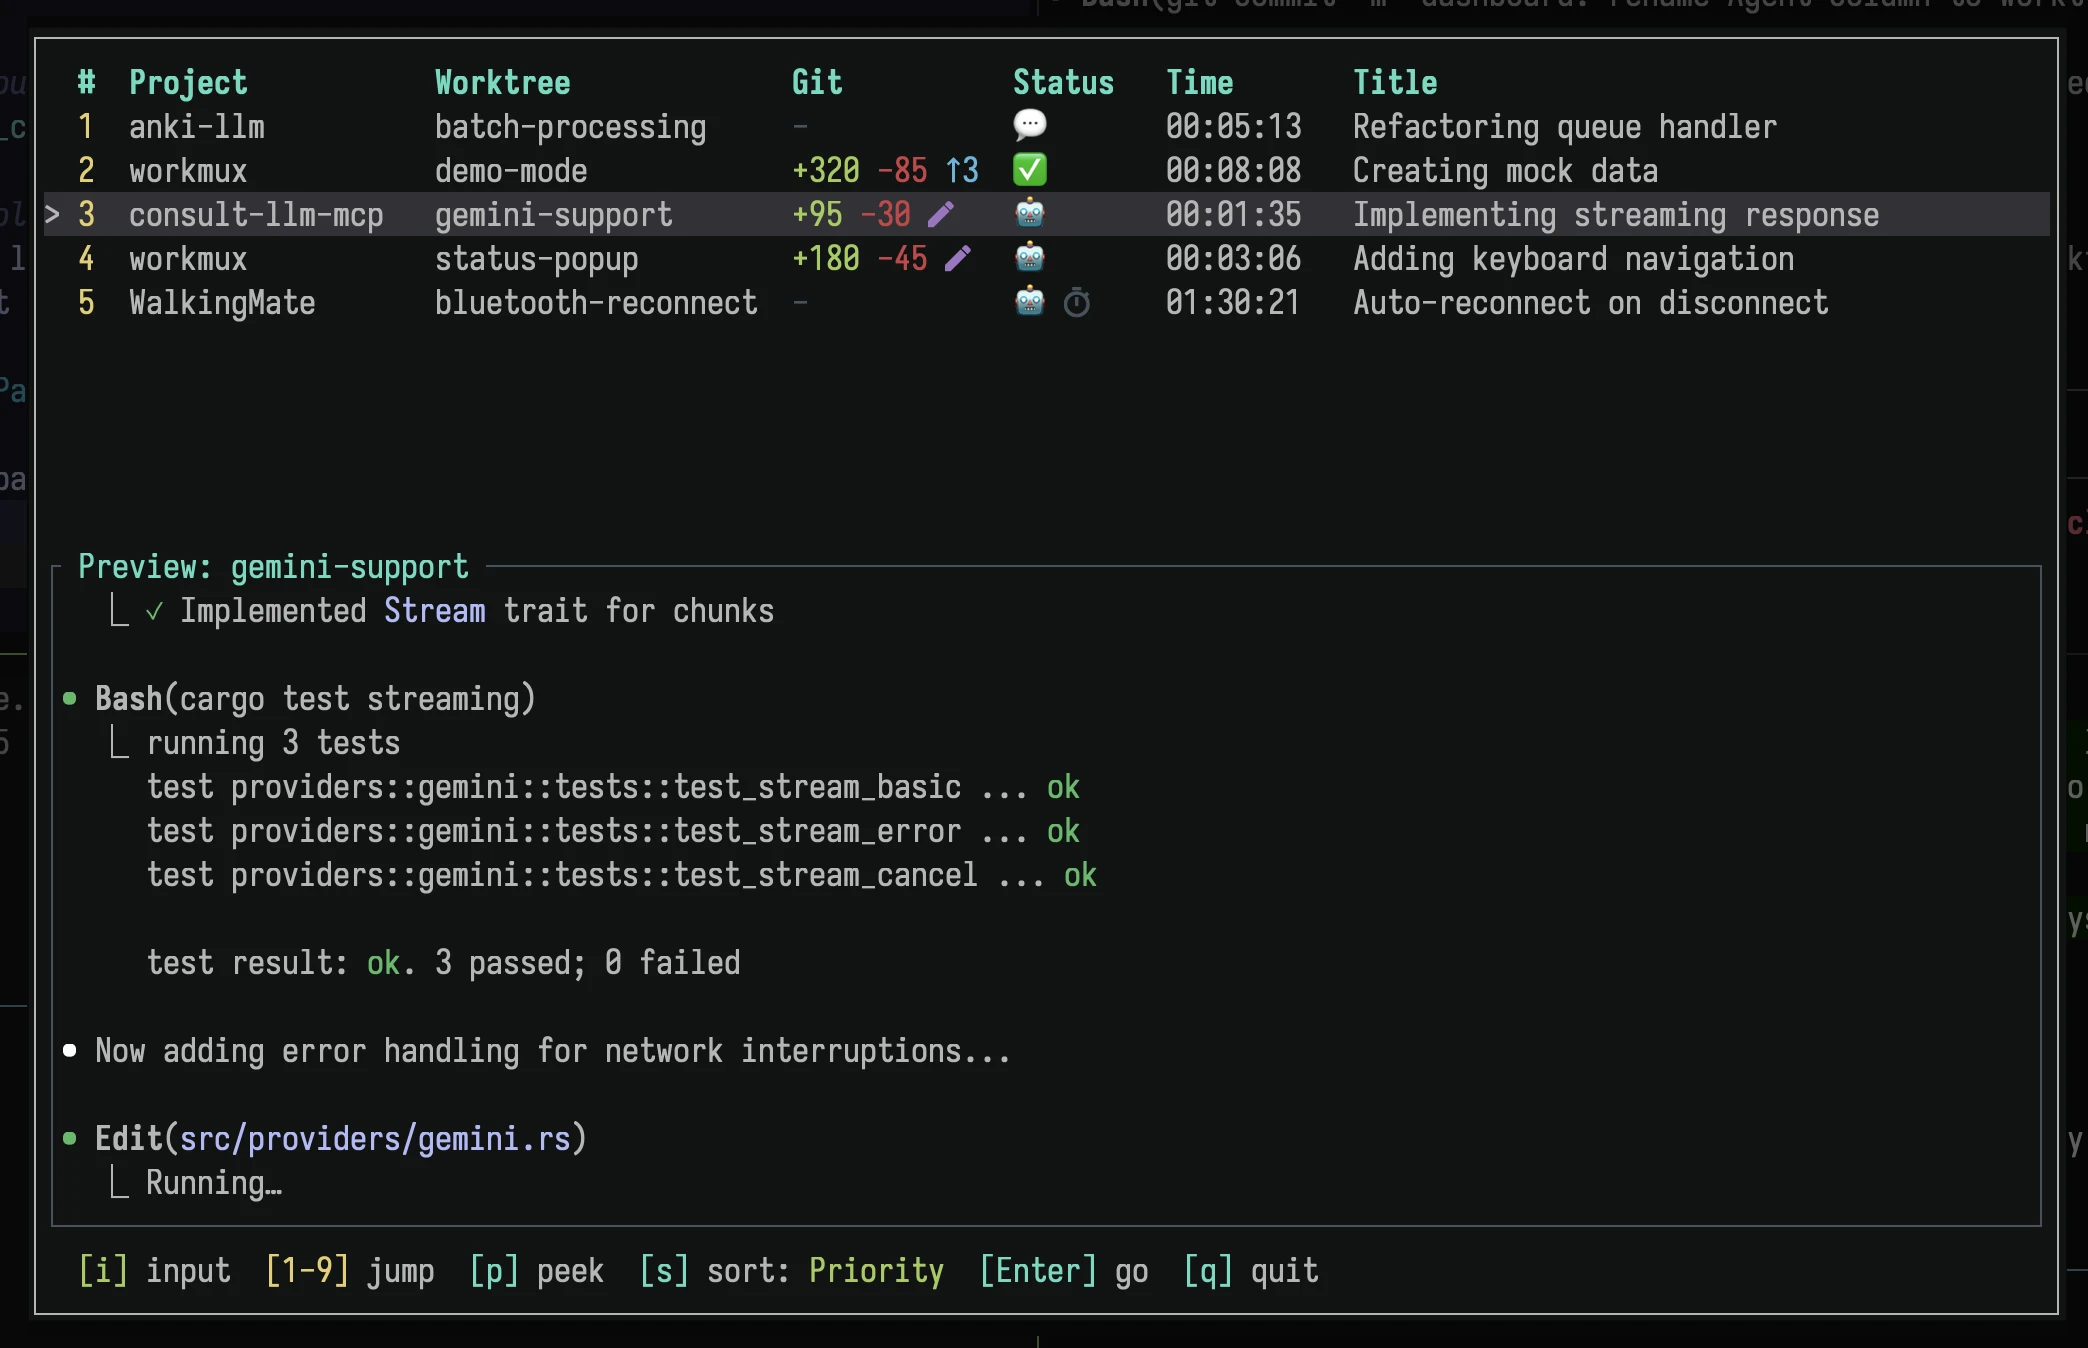
workmux dashboard
Opens a TUI dashboard showing all active AI agents across all tmux sessions.
Useful for monitoring multiple parallel agents and quickly jumping between them.
Options
-d, --diff: Open the diff view directly for the current worktree. Useful
when you want to quickly review uncommitted changes without navigating through
the agent list.-P, --preview-size <10-90>: Set preview pane size as percentage (larger =
more preview, less table). Default: 60.-s, --session: Filter to only show agents in the current session. Useful for
session-per-project workflows where each session maps to a different
repository.-t, --tab <agents|worktrees>: Open directly on the specified tab.
[!IMPORTANT]
This feature requires agent status tracking to be
configured. Without it, no agents will appear in the dashboard.
Keybindings
| Key | Action |
|---|---|
1-9 |
Quick jump to agent (closes dashboard) |
Tab |
Toggle between current and last agent |
d |
View diff (opens WIP view) |
o |
Open PR in browser |
p |
Peek at agent (dashboard stays open) |
s |
Cycle sort mode |
/ |
Filter agents by name |
F |
Toggle session filter |
f |
Toggle stale filter (show/hide stale) |
i |
Enter input mode (type to agent) |
Ctrl+u |
Scroll preview up |
Ctrl+d |
Scroll preview down |
+/- |
Resize preview pane |
Enter |
Go to selected agent (closes dashboard) |
j/k |
Navigate up/down |
: |
Open command palette |
q/Esc |
Quit |
Live preview
The bottom half shows a live preview of the selected agent’s terminal output.
The preview auto-scrolls to show the latest output, but you can scroll through
history with Ctrl+u/Ctrl+d. Press i to enter input mode and type directly
to the agent without leaving the dashboard.
Columns
- #: Quick jump key (1-9)
- Project: Project name (from
__worktreespath or directory name) - Agent: Worktree/window name
- Git: Diff stats showing branch changes (dim) and uncommitted changes
(bright). Shows a rebase icon when a rebase is in progress. - Status: Agent status icon (🤖 working, 💬 waiting, ✅ done, or “stale”)
- Time: Time since last status change
- Title: Claude Code session title (auto-generated summary)
Sort modes
Press s to cycle through sort modes:
- Priority (default): Waiting > Done > Working > Stale
- Project: Group by project name, then by priority within each project
- Recency: Most recently updated first
- Natural: Original tmux order (by pane creation)
Your sort preference persists in the tmux session.
Session filter
Press F to toggle the session filter. When active, only agents in the current
session are shown. This is useful for session-per-project workflows where each
session maps to a repository. You can also start the dashboard with --session
to default to session filtering. The preference persists across sessions.
Name filter
Press / to activate the name filter. Type to filter the agent list by project
or worktree name (case-insensitive). Press Enter to accept the filter and
return to normal navigation, or Esc to clear the filter. When a filter is
active, it is shown in the footer bar.
Stale filter
Press f to toggle between showing all agents or hiding stale ones. The filter
state persists across dashboard sessions within the same tmux server.
Diff view
Press d to view the diff for the selected agent. The diff view has two modes:
- WIP - Shows uncommitted changes (
git diff HEAD) - review - Shows all changes on the branch vs main (
git diff main...HEAD)
Press Tab to toggle between modes. The footer displays which mode is active
along with diff statistics showing lines added (+) and removed (-).
| Key | Action |
|---|---|
Tab |
Toggle WIP / review |
a |
Enter patch mode (WIP only) |
j/k |
Scroll down/up |
Ctrl+d |
Page down |
Ctrl+u |
Page up |
c |
Send commit command to agent |
m |
Trigger merge and exit dashboard |
: |
Open command palette |
q/Esc |
Close diff view |
Patch mode
Patch mode (a from WIP diff) allows staging individual hunks like
git add -p. This is useful for selectively staging parts of an agent’s work.
When delta is installed, hunks are
rendered with syntax highlighting for better readability.
| Key | Action |
|---|---|
y |
Stage current hunk |
n |
Skip current hunk |
u |
Undo last staged hunk |
s |
Split hunk (if splittable) |
o |
Comment on hunk (sends to agent) |
j/k |
Navigate to next/previous hunk |
: |
Open command palette |
q/Esc |
Exit patch mode |
Press y to stage the current hunk and advance to the next. Press n to skip
without staging. The counter in the header shows your progress (e.g., [3/10]).
Press s to split the current hunk into smaller pieces when there are context
lines between separate changes. Press u to undo the last staged hunk.
Press o to comment on the current hunk. This sends a message to the agent
including the file path, line number, the diff hunk as context, and your
comment. Useful for giving feedback like “This function should handle the error
case”.
Example tmux binding
Add to your ~/.tmux.conf for quick access:
bind C-s display-popup -h 30 -w 100 -E "workmux dashboard"

# Open directly on Worktrees tab
bind C-w display-popup -h 30 -w 100 -E "workmux dashboard --tab worktrees"
Then press prefix + Ctrl-s to open the dashboard as a tmux popup.
workmux sidebar
Toggles a live agent status sidebar on the left side of all tmux windows. Shows
all active agents across all sessions and projects with live status updates,
providing an always-visible overview without taking over the full screen like
the dashboard.
workmux sidebar            # Toggle sidebar on/off (all sessions)
workmux sidebar --session  # Toggle current session only, or opt out of global mode
The sidebar displays:
- Status icon (working/waiting/done with spinner animation)
- Project and worktree name (e.g.
myproject/fix-bug) - Elapsed time since last status change
| Key | Action |
|---|---|
j/k |
Navigate up/down |
Enter |
Jump to agent |
g/G |
Jump to first/last |
v |
Toggle layout mode |
q |
Quit sidebar |
When the global sidebar is active, workmux sidebar --session hides it in the
current tmux session only. Run the same command again to show it in that session
again while keeping the global sidebar active elsewhere.
Configure width and layout in .workmux.yaml:
sidebar:
  width: 40 # absolute columns, or "15%" for percentage
  layout: tiles # "compact" or "tiles" (default)
Example tmux binding
bind C-t run-shell "workmux sidebar"
Then press prefix + Ctrl-t to toggle the sidebar.
Note: The sidebar is currently tmux-only. When enabled, a sidebar pane is
created in every existing window, and new windows automatically get one via a
tmux hook.
workmux sandbox
Commands for managing sandbox functionality. See the
sandbox guide for full
documentation.
| Command | Description |
|---|---|
sandbox pull |
Pull the latest container image from the registry |
sandbox build |
Build the container image locally |
sandbox shell |
Start an interactive shell inside a sandbox |
sandbox agent |
Run the configured agent in a sandbox with RPC support |
sandbox stop |
Stop running Lima VMs |
sandbox prune |
Delete unused Lima VMs to reclaim disk space |
sandbox install-dev |
Cross-compile and install workmux into sandboxes (dev) |
workmux claude prune
Removes stale entries from Claude config (~/.claude.json) that point to
deleted worktree directories. When you run Claude Code in worktrees, it stores
per-worktree settings in that file. Over time, as worktrees are merged or
deleted, it can accumulate entries for paths that no longer exist.
What happens
- Scans
~/.claude.jsonfor entries pointing to non-existent directories - Creates a backup at
~/.claude.json.bakbefore making changes - Removes all stale entries
- Reports the number of entries cleaned up
Safety
- Only removes entries for absolute paths that don’t exist
- Creates a backup before modifying the file
- Preserves all valid entries and relative paths
Examples
# Clean up stale Claude Code entries
workmux claude prune
Example output
  - Removing: /Users/user/project__worktrees/old-feature

✓ Created backup at ~/.claude.json.bak
✓ Removed 3 stale entries from ~/.claude.json
workmux completions <shell>
Generates shell completion script for the specified shell. Completions provide
tab-completion for commands and dynamic branch name suggestions.
<shell>: Shell type:bash,zsh, orfish.
Examples
# Generate completions for zsh
workmux completions zsh
See the Shell Completions section for installation
instructions.
workmux docs
Displays this README with terminal formatting. Useful for quick reference
without leaving the terminal.
When run interactively, renders markdown with colors and uses a pager (less).
When piped (e.g., to an LLM), outputs raw markdown for clean context.
Using with AI agents
You can ask an agent to read the docs and configure workmux for you:
> run `workmux docs` and configure workmux so that on the left pane
  there is claude as agent, and on the right side neovim and empty
  shell on top of each other

⏺ Bash(workmux docs)
  ⎿  <p align="center">
       <picture>
     … +923 lines

⏺ Write(.workmux.yaml)
  ⎿  Wrote 9 lines to .workmux.yaml

⏺ Created .workmux.yaml with the layout:
  - Left: claude agent (focused)
  - Right top: neovim
  - Right bottom: empty shell
Agent status tracking
Workmux can display the status of the agent in your tmux window list, giving you
at-a-glance visibility into what the agent in each window doing.

Key
- 🤖 = agent is working
- 💬 = agent is waiting for user input
- ✅ = agent finished (auto-clears on window focus)
| Agent | Status |
|---|---|
| Claude Code | ✅ Supported |
| OpenCode | ✅ Supported |
| Codex | ✅ Supported* |
| Copilot CLI | ✅ Supported* |
| Pi | ✅ Supported* |
| Gemini CLI | ✅ Supported |
| Kiro | Tracking issue |
| Mistral Vibe | Tracking issue |
Notes:
- Codex: No 💬 waiting state
- Copilot CLI: No 💬 waiting state
- Pi: No 💬 waiting state
- Kiro: Hooks support is messy: requires a custom agent since the default
can’t be edited
Setup
Run workmux setup to automatically detect your agent CLIs, install status
tracking hooks, and install skills:
workmux setup
You can also run specific parts: workmux setup --hooks or
workmux setup --skills. For Claude Code, CLAUDE_CONFIG_DIR is respected for
both hook and skill installation.
Workmux will also prompt you on first run if it detects an agent without status
tracking or skills configured.
Workmux automatically modifies your tmux window-status-format to display the
status icons. This happens once per session and only affects the current tmux
session (not your global config).
Manual setup
If you prefer manual setup:
Claude Code: install the workmux status plugin:
claude plugin marketplace add raine/workmux
claude plugin install workmux-status
Or manually add the hooks to ~/.claude/settings.json. See
.claude-plugin/plugin.json for the hook
configuration.
Copilot CLI: copy the hooks to your repository:
mkdir -p .github/hooks/workmux-status
curl -o .github/hooks/workmux-status/hooks.json \
  https://raw.githubusercontent.com/raine/workmux/main/.github/hooks/workmux-status/hooks.json
Note: Copilot hooks are per-repository. The waiting state is not supported due
to limitations in the Copilot CLI hooks implementation.
OpenCode: download the workmux status plugin:
mkdir -p ~/.config/opencode/plugins
curl -o ~/.config/opencode/package.json \
  https://raw.githubusercontent.com/raine/workmux/main/resources/opencode/package.json
curl -o ~/.config/opencode/plugins/workmux-status.ts \
  https://raw.githubusercontent.com/raine/workmux/main/resources/opencode/plugins/workmux-status.ts
Restart OpenCode for the plugin to take effect.
Customization
You can customize the icons in your config:
# ~/.config/workmux/config.yaml
status_icons:
  working: '🔄'
  waiting: '⏸️'
  done: '✔️'
If you prefer to manage the tmux format yourself, disable auto-modification and
add the status variable to your ~/.tmux.conf:
# ~/.config/workmux/config.yaml
status_format: false
# ~/.tmux.conf
set -g window-status-format '#I:#W#{?@workmux_status, #{@workmux_status},}#{?window_flags,#{window_flags}, }'
set -g window-status-current-format '#I:#W#{?@workmux_status, #{@workmux_status},}#{?window_flags,#{window_flags}, }'
Jump to completed or waiting agents
Use workmux last-done to quickly switch to the agent that most recently
finished its task or is waiting for user input. Repeated invocations cycle
through all completed and waiting agents in reverse chronological order.
Add a tmux keybinding for quick access:
# ~/.tmux.conf
bind-key L run-shell "workmux last-done"
Then press prefix + L to jump to the last completed or waiting agent, press
again to cycle to the next oldest, and so on.
Toggle between agents
Use workmux last-agent to toggle between your current agent and the last one
you visited. This works like vim’s Ctrl+^ or tmux’s last-window - it
remembers which agent you came from and switches back to it. Pressing it again
returns you to where you were.
This is available both as a CLI command and as the Tab key in the dashboard.
Add a tmux keybinding for quick access:
# ~/.tmux.conf
bind Tab run-shell "workmux last-agent"
Then press prefix + Tab to toggle between your two most recent agents.
Sandbox
workmux can run agents inside containers (Docker/Podman/Apple Container) or Lima
VMs, isolating them from your host. Agents are restricted to the project
worktree; sensitive files like SSH keys, AWS credentials, and other secrets are
not accessible. This lets you run agents with --dangerously-skip-permissions
without worrying about what they might touch on your host.
Sandboxing is transparent: status indicators, the dashboard, spawning new
agents, and merging all continue to work normally across the sandbox boundary.
Backends
| Container (Docker/Podman/Apple Container) | Lima VM | |
|---|---|---|
| Isolation | Process/VM-level | Machine-level (virtual machine) |
| Persistence | Ephemeral (new container per session) | Persistent (stateful VMs) |
| Toolchain | Custom Dockerfile or host command proxying | Built-in Nix & Devbox support |
| Network | Optional restrictions (domain allowlist) | Unrestricted |
Container is a good default: simple to set up and ephemeral, so no state
accumulates between sessions. Choose Lima if you want persistent VMs with
built-in Nix/Devbox toolchain support.
Quick start
# ~/.config/workmux/config.yaml or .workmux.yaml
sandbox:
  enabled: true
  # backend: lima  # uncomment for Lima VMs (default: container)
The pre-built container image is pulled automatically on first run. For Lima,
the VM is created and provisioned on first use.
Shared features
Both backends support:
- Host command proxying: Run specific commands (build tools, linters) on the
host from inside the sandbox viahost_commandsconfig - Extra mounts: Mount additional host directories into the sandbox
(read-only by default) - Git identity: Your
user.nameanduser.emailare automatically injected
so git commits work without exposing your full~/.gitconfig - Credential sharing: Agent credentials are shared between host and sandbox
- Network restrictions (container only): Block outbound connections except
to approved domains
See the sandbox guide for full
setup, configuration, and security details.
Session mode
By default, workmux creates tmux windows within your current session. With
session mode, each worktree gets its own tmux session instead. This allows
each worktree to have multiple windows.
Enabling session mode
Add to your config:
# ~/.config/workmux/config.yaml or .workmux.yaml
mode: session
Or use the --session flag:
workmux add feature-branch --session
How it works
- Persistence: The mode is stored per-worktree. If you create a worktree
with--session, subsequentopen/close/removecommands automatically
use session mode for that worktree. - Navigation: After
mergeorremove, workmux switches you back to the
previous session.
Multiple windows per session
Use the windows config to launch multiple windows in each session. Each window
can have its own pane layout. This is mutually exclusive with the top-level
panes config.
mode: session
windows:
  - name: editor
    panes:
      - command: <agent>
        focus: true
      - split: horizontal
        size: 20
  - name: tests
    panes:
      - command: just test --watch
  - panes:
      - command: tail -f app.log
Each window supports:
| Option | Description | Default |
|---|---|---|
name |
Window name (if omitted, tmux auto-names from command) | Auto |
panes |
Pane layout (same syntax as top-level panes) |
Single shell |
focus: true works across windows: the last pane with focus set determines
which window is selected when the session opens.
Limitations
- tmux only: Session mode is currently only supported for the tmux backend.
- No duplicates: Unlike window mode which supports opening multiple windows
for the same worktree (-2,-3suffixes), session mode creates one session
per worktree.
Workflow example
Here’s a complete workflow:
# Start a new feature
workmux add user-auth

# Work on your feature...
# (tmux automatically sets up your configured panes and environment)

# When ready, merge and clean up
workmux merge user-auth

# Start another feature
workmux add api-endpoint

# List all active worktrees
workmux list
Before and after
workmux turns a multi-step manual workflow into simple commands, making parallel
development workflows practical.
Without workmux
# 1. Manually create the worktree and environment
git worktree add ../worktrees/user-auth -b user-auth
cd ../worktrees/user-auth
cp ../../project/.env.example .env
ln -s ../../project/node_modules .
npm install
# ... and other setup steps

# 2. Manually create and configure the tmux window
tmux new-window -n user-auth
tmux split-window -h 'npm run dev'
tmux send-keys -t 0 'claude' C-m
# ... repeat for every pane in your desired layout

# 3. When done, manually merge and clean everything up
cd ../../project
git switch main && git pull
git merge --no-ff user-auth
tmux kill-window -t user-auth
git worktree remove ../worktrees/user-auth
git branch -d user-auth
With workmux
# Create the environment
workmux add user-auth

# ... work on the feature ...

# Merge and clean up
workmux merge
The parallel AI workflow
Run multiple AI agents simultaneously, each in its own worktree.
# Spin up two agents working on different tasks
workmux add refactor-user-model -p "Refactor the User model to use composition"
workmux add add-search-endpoint -p "Add a /search endpoint with pagination"

# Each agent works in isolation. Check progress via tmux windows or the dashboard
workmux dashboard

# Merge completed work back to main
workmux merge refactor-user-model
workmux merge add-search-endpoint
[!TIP]
Use-A(--auto-name) to generate branch names automatically from your
prompt, so you don’t have to think of one. See
Automatic branch name generation.
Why git worktrees?
Git worktrees let you have multiple
branches checked out at once in the same repository, each in a separate
directory. This provides two main advantages over a standard single-directory
setup:
-
Painless context switching: Switch between tasks just by changing
directories (cd ../other-branch). There’s no need togit stashor make
temporary commits. Your work-in-progress, editor state, and command history
remain isolated and intact for each branch. -
True parallel development: Work on multiple branches simultaneously
without interference. You can run builds, install dependencies
(npm install), or run tests in one worktree while actively coding in
another. This isolation is perfect for running multiple AI agents in parallel
on different tasks.
In a standard Git setup, switching branches disrupts your flow by requiring a
clean working tree. Worktrees remove this friction. workmux automates the
entire process and pairs each worktree with a dedicated tmux window, creating
fully isolated development environments. See
Before and after for how workmux streamlines this workflow.
Git worktree caveats
While powerful, git worktrees have nuances that are important to understand.
workmux is designed to automate solutions to these, but awareness of the
underlying mechanics helps.
- Gitignored files require configuration
- Conflicts
- Package manager considerations (pnpm, yarn)
- Rust projects
- Port conflicts in monorepos
- Symlinks and
.gitignoretrailing slashes - Local git ignores (
.git/info/exclude) are not shared
Gitignored files require configuration
When git worktree add creates a new working directory, it’s a clean checkout.
Files listed in your .gitignore (e.g., .env files, node_modules, IDE
configuration) will not exist in the new worktree by default. Your application
will be broken in the new worktree until you manually create or link these
necessary files.
This is a primary feature of workmux. Use the files section in your
.workmux.yaml to automatically copy or symlink these files on creation:
# .workmux.yaml
files:
  copy:
    - .env # Copy environment variables
  symlink:
    - .next/cache # Share Next.js build cache
Note: Symlinking node_modules can be efficient but only works if all worktrees
share identical dependencies. If different branches have different dependency
versions, each worktree needs its own installation. For dependency installation,
consider using a pane command instead of post_create hooks - this runs the
install in the background without blocking the worktree and window creation:
panes:
  - command: npm install
    focus: true
  - split: horizontal
Conflicts
Worktrees isolate your filesystem, but they do not prevent merge conflicts. If
you modify the area of code on two different branches (in two different
worktrees), you will still have a conflict when you merge one into the other.
The best practice is to work on logically separate features in parallel
worktrees. When conflicts are unavoidable, use standard git tools to resolve
them. You can also leverage an AI agent within the worktree to assist with the
conflict resolution.
Package manager considerations (pnpm, yarn)
Modern package managers like pnpm use a global store with symlinks to
node_modules. Each worktree typically needs its own pnpm install to set up
the correct dependency versions for that branch.
If your worktrees always have identical dependencies (e.g., working on multiple
features from the same base), you could potentially symlink node_modules
between worktrees. However, this breaks as soon as branches diverge in their
dependencies, so it’s generally safer to run a fresh install in each worktree.
Note: In large monorepos, cleaning up node_modules during worktree removal can
take significant time. workmux has a
special cleanup mechanism
that moves node_modules to a temporary location and deletes it in the
background, making the remove command return almost instantly.
Rust projects
Unlike node_modules, Rust’s target/ directory should not be symlinked
between worktrees. Cargo locks the target directory during builds, so sharing
it would block parallel builds and defeat the purpose of worktrees.
Instead, use sccache to share compiled
dependencies across worktrees:
brew install sccache
Add to ~/.cargo/config.toml:
[build]
rustc-wrapper = "sccache"
This caches compiled dependencies globally, so new worktrees benefit from cached
artifacts without any lock contention.
Port conflicts in monorepos
When running multiple services (API, web app, database) in a monorepo, each
worktree needs unique ports to avoid conflicts. For example, if your .env has
hardcoded ports like API_PORT=3001 and VITE_PORT=3000, running two worktrees
simultaneously would fail because both would try to bind to the same ports.
Simply copying .env files won’t work since all worktrees would use the same
ports.
Solution: Use a post_create hook to generate a .env.local file with
unique ports. Many frameworks (Vite, Next.js, CRA) automatically load
.env.local and merge it with .env, with .env.local taking precedence. For
plain Node.js, use multiple --env-file flags where later files override
earlier ones.
Create a script at scripts/worktree-env:
#!/usr/bin/env bash
set -euo pipefail

port_in_use() {
  lsof -nP -iTCP:"$1" -sTCP:LISTEN &>/dev/null
}

find_port() {
  local port=$1
  while port_in_use "$port"; do
    ((port++))
  done
  echo "$port"
}

# Hash the handle to get a deterministic port offset (0-99)
hash=$(echo -n "$WM_HANDLE" | md5 | cut -c1-4)
offset=$((16#$hash % 100))

# Find available ports starting from the hash-based offset
api_port=$(find_port $((3001 + offset * 10)))
vite_port=$(find_port $((3000 + offset * 10)))

# Generate .env.local with port overrides
cat >.env.local <<EOF
API_PORT=$api_port
VITE_PORT=$vite_port
VITE_PUBLIC_API_URL=http://localhost:$api_port
EOF

echo "Created .env.local with ports: API=$api_port, VITE=$vite_port"
Configure workmux to copy .env and generate .env.local:
# .workmux.yaml
files:
  copy:
    - .env # Copy secrets (DATABASE_URL, API keys, etc.)

post_create:
  - ./scripts/worktree-env # Generate .env.local with unique ports
For plain Node.js (without framework support), load both files with later
overriding earlier:
{
  "scripts": {
    "api": "node --env-file=.env --env-file=.env.local api/server.js",
    "web": "node --env-file=.env --env-file=.env.local web/server.js"
  }
}
Each worktree now gets unique ports derived from its name, allowing multiple
instances to run simultaneously without conflicts. The .env file stays
untouched, and .env.local is gitignored.
See the Monorepos guide for
alternative approaches using direnv.
Symlinks and .gitignore trailing slashes
If your .gitignore uses a trailing slash to ignore directories (e.g.,
tests/venv/), symlinks to that path in the created worktree will not be
ignored and will show up in git status. This is because venv/ only matches
directories, not files (symlinks).
To ignore both directories and symlinks, remove the trailing slash:
- tests/venv/
+ tests/venv
Local git ignores (.git/info/exclude) are not shared
The local git ignore file, .git/info/exclude, is specific to the main
worktree’s git directory and is not respected in other worktrees. Personal
ignore patterns for your editor or temporary files may not apply in new
worktrees, causing them to appear in git status.
For personal ignores, use a global git ignore file. For project-specific ignores
that are safe to share with your team, add them to the project’s main
.gitignore file.
Tips
Nerdfont icons
On first run, workmux prompts you to check if a git branch icon displays
correctly. If you have a Nerd Font installed,
answer yes to enable nerdfont icons throughout the interface, including the tmux
window prefix.

To change the setting later, edit ~/.config/workmux/config.yaml:
nerdfont: true # or false for unicode fallbacks
Using direnv
If your project uses direnv for environment management,
you can configure workmux to automatically set it up in new worktrees:
# .workmux.yaml
post_create:
  - direnv allow

files:
  symlink:
    - .envrc
Claude Code permissions
By default, Claude Code prompts for permission before running commands. There
are several ways to handle this in worktrees:
Share permissions across worktrees
To keep permission prompts but share granted permissions across worktrees:
files:
  symlink:
    - .claude/settings.local.json
Add this to your global config (~/.config/workmux/config.yaml) or project’s
.workmux.yaml. Since this file contains user-specific permissions, also add it
to .gitignore:
.claude/settings.local.json
Skip permission prompts (yolo mode)
To skip prompts entirely, define a
named agent that shadows
claude:
# ~/.config/workmux/config.yaml
agents:
  claude: 'claude --dangerously-skip-permissions'
This makes all workmux-created worktrees use the flag automatically, without
affecting claude outside of workmux. You can also use a separate name and
reference it per-project with agent: cc-yolo.
Delegating tasks with /worktree
The /worktree skill lets you
delegate tasks to parallel worktree agents directly from your conversation. A
main agent on the main branch can act as a coordinator: planning work and
spinning up worktree agents for each task.
📝 See
this blog post for a
detailed walkthrough of the workflow.
Usage
> /worktree Implement user authentication
> /worktree Fix the race condition in handler.go
> /worktree Add dark mode, Implement caching  # multiple tasks
See the Skills guide for more skills
including /merge, /rebase, /coordinator, and /open-pr.
Shell completions
To enable tab completions for commands and branch names, add the following to
your shell’s configuration file.
For bash, add to your .bashrc:
eval "$(workmux completions bash)"
For zsh, add to your .zshrc:
eval "$(workmux completions zsh)"
For fish, add to your config.fish:
workmux completions fish | source
Requirements
- Rust (for building)
- Git 2.5+ (for worktree support)
- tmux (or an alternative backend)
Alternative backends
While tmux is the primary and recommended backend, workmux also supports
alternative terminal multiplexers:
- WezTerm (experimental) - For
users who prefer WezTerm’s features. Thanks to
@JeremyBYU for contributing this backend. - kitty (experimental) - For users
who prefer kitty terminal. Requiresallow_remote_controlandlisten_on
configuration. - Zellij (experimental) - For
users who prefer Zellij. Detected automatically via$ZELLIJ.
workmux auto-detects the backend from environment variables ($TMUX,
$WEZTERM_PANE, $KITTY_WINDOW_ID, or $ZELLIJ). Session-specific variables
are checked first, so running tmux inside kitty correctly selects the tmux
backend. Set $WORKMUX_BACKEND to override detection.
Inspiration and related tools
workmux is inspired by wtp, an excellent git
worktree management tool. While wtp streamlines worktree creation and setup,
workmux takes this further by tightly coupling worktrees with tmux window
management.
For managing multiple AI agents in parallel, tools like
claude-squad and
vibe-kanban offer dedicated
interfaces, like a TUI or kanban board. In contrast, workmux adheres to its
philosophy that tmux is the interface, providing a native tmux experience
for managing parallel workflows without requiring a separate interface to learn.
Contributing
Bug reports and feature suggestions are always welcome via issues or
discussions. Large and/or complex PRs, especially without prior discussion, may
not get merged. Thanks for contributing!
See CONTRIBUTING.md for development setup.
Related projects
- tmux-tools — Collection of tmux
utilities including file picker, smart sessions, and more - tmux-file-picker — Pop up fzf in
tmux to quickly insert file paths, perfect for AI coding assistants - tmux-bro — Smart tmux session manager
that sets up project-specific sessions automatically - git-surgeon — Non-interactive
hunk-level git staging for AI agents - claude-history — Search and view
Claude Code conversation history with fzf - consult-llm — Consult other AI models
from your agent workflow - tmux-agent-usage — Display AI agent
rate limit usage in your tmux status bar