React-Complete-Guide-Course
Useful Commands & Notes
find . -name 'node_modules' -type d -prune -exec rm -rf '{}' +
Firebase endpoint: https://react-complete-course-85dc9-default-rtdb.firebaseio.com/
Notes
- GENERAL.md
- adding-css-modules.md
- arrow-func.md
- cookies-vs-local-storage.md
- css-position.md
- custom-hooks.md
- closures.md
- dynamic-classes.md
- dynamic-styles.md
- events-practice.md
- expense-form-state.md
- fixing-errors.md
- FreeCodeCamp.md
- http-responses.md
- immutable-update-patterns.md
- outputting-conditional-content.md
- primatives-vs-references.md
- push-pop-shift-unshift.md
- react-basics.md
- react-hooks.md
- react-hooks-reference.md
- rendering-lists-of-data.md
- react-interview-questions.md
- slides.pdf
- slides3.pdf
- slides4.pdf
- state-with-form-inputs.md
- synthetic-events.md
- updating-state-based-on-previous-state.md
- working-with-state.md
What is React?
A javascript library for building User Interfaces based on reusable components.
Why use react?
traditionally any button on a website triggered a request from a server to load a new html page.
Javascript allows us to manipulate the DOM without loading a new page and react is a JS library
Composition
in react building components using a series of smaller components is called composition
Container Copmonents
import React from "react";
import "./Card.css";
function Card(props) {
  return <div className="card">{props.children}</div>;
}
export default Card;
- props.children works because children is a reserved keyword in react and the value of the children prop will always be the content between the opening closing tags of your custom component.
props.children is important for composition using a custom wrapper component often used to apply styles that are shared among components
A closer look at JSX
in package.json we use react and reactDOM
import React from "react";
// when you use jsx it is this(React.createElement ... requires importing React from react) method that gets called behind the scenes.
/* the second argument is an object tha configures atributes of element... in here none so empty object*/
// the third and subsequent arguments are the children of each sucessivly nested element or component.
return React.createElement(
  "div",
  {},
  React.createElement("h2", {}, `Let's get started!`),
  React.createElement(Expenses, { items: expenses })
);
Events
- On all bult in html elements in react we have access to native dom events… we can use them in react by adding a prop to the element and setting it to a function that will be executed when the event occurs.
- Imperative approach:
document.getElementById("root").addEventListener("click", () => {
  console.log("clicked");
});
In react we add a special prop to the element we want to listen to and set it to a function that will be executed when the event occurs.
React exposes events as props that start with prefix on… so onClick, onChange, onSubmit, etc.
i.e.
<button onClick={clickHandler}>Change Title</button>
//here we are just pointing to the function and not calling it
all the on-event handler props want a function passed as a value which will be executed when the event occurs.
- It is convention that you name your eventHandler functions as the event name + Handler i.e. clickHandler, submitHandler, etc.
const clickHandler = () => {
  setTitle("Updated!");
  console.log(title);
};
UseState
useState is a react hook that allows you to manage state in functional components.
// let title = props.title;
const [title, setTitle] = useState(props.title);
- We can’t use let title = props.title because react will only run the function once and not re-run it when the state changes. so we use useState to manage state in functional components.
import React, { useState } from "react";
here {UseState} is a
named importfrom react
- useState is a React hook that returns an array with 2 elements, the first element is the current state and the second element is a function that allows us to update the state.
- useState is declared inside of our component function. It should be called at the top level of the function… do not nest UseState inside of if statements or loops or other functions.
- UseState wants a default value as an argument. This is the initial value that will be used when the component is first rendered.
We use array destructuring to store the current state and update state function in variables.
const [title, setTitle] = useState(props.title);
- the initial value of title is the value of props.title which is passed in as a prop from the parent component.
- We can use the update state function (setTitle) to update the state.
The useState hook always returns an array with these two elements.
Now instead of using the title variable we use the state variable. - So
const clickHandler = () => {
  title = "Updated!";
  console.log(title);
};
- becomes
const clickHandler = () => {
  setTitle("Updated!");
  console.log(title);
};
Expense Item Code:
import React, { useState } from "react";
import ExpenseDate from "./ExpenseDate";
import Card from "../UI/Card";
import "./ExpenseItem.css";
const ExpenseItem = (props) => {
  // let title = props.title;
  const [title, setTitle] = useState(props.title);
  console.log("ExpenseItem evaluated by React");
  const clickHandler = () => {
    setTitle("Updated!");
    console.log(title);
  };
  return (
    <Card className="expense-item">
      <ExpenseDate date={props.date} />
      <div className="expense-item__description">
        <h2>{title}</h2>
        <div className="expense-item__price">${props.amount}</div>
      </div>
      <button onClick={clickHandler}>Change Title</button>
    </Card>
  );
};
export default ExpenseItem;
- In the above code calling setTitle(“Updated!”) will not update the title variable but will update the state variable which will cause react to re-evaluate the component function and update the dom. Changes to the state will cause react to re-render the component on which the state is used and only that component.
- Notice that below
const [title, setTitle] = useState(props.title);
- we are using const here even though we do eventually assign a new value to title. This is because we are not reassigning the variable title but rather the state variable which is managed by react.
- The line above is exicuted whenever the component is re-evaulated by react. So if the state changes react will re-evaluate the component and re-execute the useState hook.
Events in vanilla javascript:
document.getElementById("root").addEventListener("click", (event) => {
  console.log("clicked");
});
- The following syntax:
const titleChangeHandler = (event) => {
  setUserInput({ ...userInput, enteredTitle: event.target.value });
};
const amountChangeHandler = (event) => {
  setUserInput({ ...userInput, enteredAmount: event.target.value });
};
const dateChangeHandler = (event) => {
  setUserInput({ ...userInput, enteredDate: event.target.value });
};
takes all of the properties of the userInput object and adds them to a new object. It then overwrites the enteredTitle property with the new value. This is called merging objects. It is a common pattern in react to merge objects when you want to update a state property that is an object.
Single State version of Expense Form:
import React, { useState } from "react";
import "./ExpenseForm.css";
const ExpenseForm = () => {
  //   const [enteredTitle, setEnteredTitle] = useState("");
  //   const [enteredAmount, setEnteredAmount] = useState("");
  //   const [enteredDate, setEnteredDate] = useState("");
  const [userInput, setUserInput] = useState({
    enteredTitle: "",
    enteredAmount: "",
    enteredDate: "",
  });
  const titleChangeHandler = (event) => {
    console.log("title change event: value:", event.target.value);
    // setEnteredTitle(event.target.value);
    setUserInput((previousState) => {
      return { ...userInput, enteredTitle: event.target.value };
    });
  };
  const amountChangeHandler = (event) => {
    console.log("amount change event: value:", event.target.value); //event.target.value is a string even if the input type is number
    // setEnteredAmount(event.target.value);
    setUserInput((previousState) => {
      return { ...userInput, enteredAmount: event.target.value };
    });
  };
  const dateChangeHandler = (event) => {
    console.log("date change event: value:", event.target.value);
    // setEnteredDate(event.target.value);
    setUserInput((previousState) => {
      return { ...userInput, enteredDate: event.target.value };
    });
  };
  return (
    <form>
      <div className="new-expense__controls">
        <div className="new-expense__control">
          <label>Title</label>
          <input type="text" onChange={titleChangeHandler} />
        </div>
        <div className="new-expense__control">
          <label>Amount</label>
          <input
            type="number"
            min="0.01"
            step="0.01"
            onChange={amountChangeHandler}
          />
        </div>
        <div className="new-expense__control">
          <label>Date</label>
          <input
            type="date"
            min="2019-01-01"
            max="2023-12-31"
            onChange={dateChangeHandler}
          />
        </div>
      </div>
      <div className="new-expense__actions">
        <button type="submit">Add Expense</button>
      </div>
    </form>
  );
};
export default ExpenseForm;
Submitting and Working with Form Data:
    const submitHandler = ( event ) => {
        event.preventDefault();
        const expenseData = {
            title: enteredTitle,
            amount: enteredAmount,
            date: new Date( enteredDate ),
        };
  return (
      <form onSubmit={ submitHandler}>
- onSubmit is a special event that is triggered when the form is submitted. It submits a request to the server, in this case the development server and that’s not what we want here.
- Here we want to prevent the default behavior of the form and instead handle the data ourselves. We do this by calling event.preventDefault() in the submitHandler function.
Two way binding:
In React, data flows one way: from owner to child. We think that this makes your app’s code easier to understand. You can think of it as “one-way data binding.”
However, there are lots of applications that require you to read some data and flow it back into your program. For example, when developing forms, you’ll often want to update some React state when you receive user input. Or perhaps you want to perform layout in JavaScript and react to changes in some DOM element size.
In React, you would implement this by listening to a “change” event, read from your data source (usually the DOM) and call setState() on one of your components. “Closing the data flow loop” explicitly leads to more understandable and easier-to-maintain programs.
Two-way binding — implicitly enforcing that some value in the DOM is always consistent with some React state — is concise and supports a wide variety of applications. We’ve provided LinkedStateMixin: syntactic sugar for setting up the common data flow loop pattern described above, or “linking” some data source to React state.
- For inputs we don’t just listen for changes but we can aslo pass a new value back into the input so that we can reset the input programatically. This is called two way binding.
<input type="text" value="" onChange={titleChangeHandler} />
// onChange is a prop that wants a function as a value
This will set the internal value property which every input element has and we can set it to a new value.
const submitHandler = (event) => {
  event.preventDefault();
  const expenseData = {
    title: enteredTitle,
    amount: enteredAmount,
    date: new Date(enteredDate),
  };
  console.log(expenseData);
  setEnteredTitle("");
  setEnteredAmount("");
  setEnteredDate("");
};
We can clear the data after hittin submit using the following code:
   setEnteredTitle("");
    setEnteredAmount("");
    setEnteredDate("");
    ```
How to pass data from child to parent component:
we pass data from parent to child via props and from child to parent via function props.
We can pass data from child to parent via function props.We can create our own event props that expect functions as values which allows us to pass a function from a parent component to a child component and then call that function inside of the child component. When we call said function we can pass data to that function as a parameter and that data will then be passed back to the parent component.
props can only be passed from parent component to child and we can’t skip intermediate components.
Let’s say we want to pass expense data which we gather in the expense form component to the new expense component. We can do this by passing a function from the new expense component to the expense form component and then call that function inside of the expense form component and pass the data as a parameter to that function.
NEW EXPENSE COMPONENT:
import React from "react";
import "./NewExpense.css";
import ExpenseForm from "./ExpenseForm";
const NewExpense = (props) => {
  //the value for onSaveExpenseData should be a function that is triggered when the user clicks the submit button.
  const onSaveExpenseDataHandler = (enteredExpenseData) => {
    const expenseData = {
      ...enteredExpenseData,
      id: Math.random().toString(),
    };
    console.log("expense data enriched with id property", expenseData);
    props.onAddExpense(expenseData);
  };
  //the value for onSaveExpenseData should be a function that is triggered when the user clicks the submit button... we can pass data as an argument to onSaveExpenseDataHandler to pass that data from the child component to the parent component.
  //onSaveExpenseDataHandler is a function that is passed as a value to onSaveExpenseData ... it does not get executed here, hence the absence of (). It will be exicuted in the expense form component when the user clicks the submit button.
  return (
    <div className="new-expense">
      <ExpenseForm onSaveExpenseData={onSaveExpenseDataHandler} />
    </div>
  );
};
export default NewExpense;
Keys in Lists:
Keys help React identify which items have changed, are added, or are removed. Keys should be given to the elements inside the array to give the elements a stable identity.
A “key” is a special string attribute you need to include when creating lists of elements in React. Keys are used in React to identify which items in the list are changed, updated, or deleted. In other words, we can say that keys are used to give an identity to the elements in the lists. The next thing that comes to mind is that what should be good to be chosen as key for the items in lists. It is recommended to use a string as a key that uniquely identifies the items in the list. Below example shows a list with string keys:
const numbers = [1, 2, 3, 4, 5];
const updatedNums = numbers.map((number) => {
  return <li key={index}>{number} </li>;
});
You can also assign the array indexes as keys to the list items. The below example assigns array indexes as key to the elements.
const numbers = [1, 2, 3, 4, 5];
const updatedNums = numbers.map((number, index) => (
  <li key={index}>{number}</li>
));
Assigning indexes as keys are highly discouraged because if the elements of the arrays get reordered in the future then it will get confusing for the developer as the keys for the elements will also change.
Using Keys with Components
Consider a situation where you have created a separate component for list items and you are extracting list items from that component. In that case, you will have to assign keys to the component you are returning from the iterator and not to the list items. That is you should assign keys to
Below code shows incorrect usage of keys:
import React from "react";
import ReactDOM from "react-dom";
// Component to be extracted
function MenuItems(props) {
  const item = props.item;
  return <li key={item.toString()}>{item}</li>;
}
// Component that will return an
// unordered list
function Navmenu(props) {
  const list = props.menuitems;
  const updatedList = list.map((listItems) => {
    return <MenuItems item={listItems} />;
  });
  return <ul>{updatedList}</ul>;
}
const menuItems = [1, 2, 3, 4, 5];
ReactDOM.render(
  <Navmenu menuitems={menuItems} />,
  document.getElementById("root")
);
**Output: **
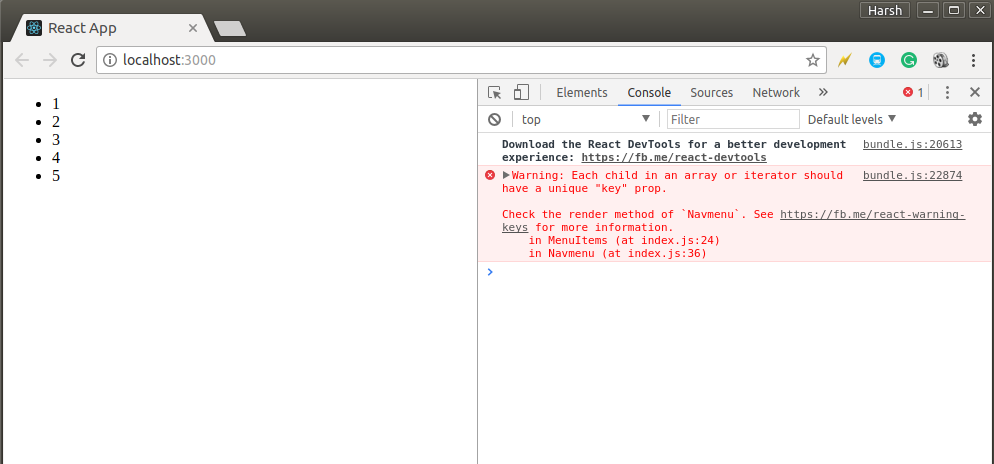
You can see in the above output that the list is rendered successfully but a warning is thrown to the console that the elements inside the iterator are not assigned keys. This is because we had not assigned key to the elements we are returning to the map() iterator.
Below example shows correct usage of keys:
import React from "react";
import ReactDOM from "react-dom";
// Component to be extracted
function MenuItems(props) {
  const item = props.item;
  return <li>{item}</li>;
}
// Component that will return an
// unordered list
function Navmenu(props) {
  const list = props.menuitems;
  const updatedList = list.map((listItems) => {
    return <MenuItems key={listItems.toString()} item={listItems} />;
  });
  return <ul>{updatedList}</ul>;
}
const menuItems = [1, 2, 3, 4, 5];
ReactDOM.render(
  <Navmenu menuitems={menuItems} />,
  document.getElementById("root")
);
Dynamic Styling in React:
The style prop on a React element accepts a JavaScript object with camelCased properties rather than a CSS string. This is consistent with the DOM style JavaScript property.
<div className="chart-bar__fill" style={{}}></div>
We use the css property names as key names.
<div className="chart-bar__fill" style={{ height: "15%" }}></div>
- += operator in js:
The addition assignment ( += ) operator adds the value of the right operand to a variable and assigns the result to the variable. The types of the two operands determine the behavior of the addition assignment operator. Addition or concatenation is possible. - For in vs for of loops in js:
Bothfor..ofandfor..instatements iterate over lists; the values iterated on are different though,for..inreturns a list of keys on the object being iterated, whereasfor..ofreturns a list of values of the numeric properties of the object being iterated.
Here is an example that demonstrates this distinction:
let list = [4, 5, 6];
for (let i in list) {
  console.log(i); // "0", "1", "2",
}
for (let i of list) {
  console.log(i); // "4", "5", "6"
}
Another distinction is that for..in operates on any object; it serves as a way to inspect properties on this object. for..of on the other hand, is mainly interested in values of iterable objects. Built-in objects like Map and Set implement Symbol.iterator property allowing access to stored values.
let pets = new Set(["Cat", "Dog", "Hamster"]);
pets["species"] = "mammals";
for (let pet in pets) {
  console.log(pet); // "species"
}
for (let pet of pets) {
  console.log(pet); // "Cat", "Dog", "Hamster"
}
Styling React Components:
- Using dynamic styles in styled-components:
import React, { useState } from "react";
import Button from "../../UI/Button/Button";
import "./CourseInput.css";
import styled from "styled-components";
//-------------------------------Form Control Component--------------------------------------
const FormControl = styled.div`
  margin: 0.5rem 0;
  & label {
    font-weight: bold;
    display: block;
    margin-bottom: 0.5rem;
  }
  & input {
    display: block;
    width: 100%;
    border: 1px solid ${(props) => (props.invalid ? "red" : "#ccc")}};
    background: ${(props) => (props.invalid ? "#fad0ec" : "transparent")};
    font: inherit;
    line-height: 1.5rem;
    padding: 0 0.25rem;
  }
  & input:focus {
    outline: none;
    background: #fad0ec;
    border-color: #8b005d;
  }
  /* the following applies to input elements that have class name form-control and invalid*/
  &.invalid input {
    border-color: red;
    background: #fad0ec;
  }
  &.invalid label {
    color: red;
  }
`;
Debugging React Apps:
Common Errors:
- Adjacent JSX elements must be wrapped in an enclosing tag. - This error occurs when you try to return multiple elements from a component. You can fix this by wrapping the elements in a div or a React Fragment.
- FunctionName is not defined - This error occurs when you try to use a function before it is defined. You can fix this by moving the function above the line where it is used.
React Practice Project Tips:
- for wrapper components like Card and Button don’t forget to put {props.children} in the return statement.
- For a function that handles a submit event don’t forget to pass the event object as an argument to the function and call event.preventDefault() to prevent the default behavior of the event.
- for input elements add the value prop to reflect the current state… use the current state from useState for the value.
Fragments Portals & Refs:
- Fragments - A common pattern in React is for a component to return multiple elements. Fragments let you group a list of children without adding extra nodes to the DOM.
- Portals - Portals provide a first-class way to render children into a DOM node that exists outside the DOM hierarchy of the parent component.
- Refs - Refs provide a way to access DOM nodes or React elements created in the render method.
- You need a wrapping element for the root element of any component because React.createComponent can only return one thing.
- you can solve this problem by wrapping adjeacent elements in a div (or any enclosing tag) or a React Fragment.
- When using wrapping divs you can end up with
div soupwhich is when you end up with tons of unnecessary divs in your code that add no semantic meaning or structure to the page but are just there to wrap other elements because React requires a single root element.i.e.
<div>
  <div>
    <div>
      <div>
        <div>
          <h2>'Div Soup'</h2>
        </div>
      </div>
    </div>
  </div>
</div>
React Fragments:
return (
  <React.Fragment>
    <h2>Fragment Demo</h2>
    <p>This is a fragment demo</p>
  </React.Fragment>
);
Or you can use the shorthand syntax:
return (
  <>
    <h2>Fragment Demo</h2>
    <p>This is a fragment demo</p>
  </>
);
React Portals:
Portals provide a first-class way to render children into a DOM node that exists outside the DOM hierarchy of the parent component.
return (
  <React.Fragment>
    <MyModal />
    <InputForm />
  </React.Fragment>
);
We can use a portal to render the modal outside of the component it was created in somewhere else on the actual DOM
React Refs:
Refs - Refs provide a way to access DOM nodes or React elements created in the render method.
AddUser.js
import React, { useState, useRef } from "react";
import Wrapper from "../Helpers/Wrapper";
import Button from "../UI/Button";
import Card from "../UI/Card";
import ErrorModal from "../UI/ErrorModal";
import classes from "./AddUser.module.css";
const AddUser = (props) => {
  const nameInputRef = useRef(); //useRef() returns an object with a property called current which is a pointer to the element we want to focus on
  const ageInputRef = useRef();
  const [enteredUsername, setEnteredUsername] = useState("");
  const [enteredAge, setEnteredAge] = useState("");
  const [error, setError] = useState();
  const addUserHandler = (event) => {
    event.preventDefault();
    console.log(nameInputRef);
    if (enteredUsername.trim().length === 0 || enteredAge.trim().length === 0) {
      setError({
        title: "Invalid input",
        message: "Please enter a valid name and age (non-empty values).",
      });
      return;
    }
    if (+enteredAge < 1) {
      setError({
        title: "Invalid age",
        message: "Please enter a valid age (> 0).",
      });
      return;
    }
    props.onAddUser(enteredUsername, enteredAge);
    setEnteredUsername("");
    setEnteredAge("");
  };
  const usernameChangeHandler = (event) => {
    setEnteredUsername(event.target.value);
  };
  const ageChangeHandler = (event) => {
    setEnteredAge(event.target.value);
  };
  const errorHandler = () => {
    setError(null);
  };
  return (
    <Wrapper>
      {error && (
        <ErrorModal
          title={error.title}
          message={error.message}
          onConfirm={errorHandler}
        />
      )}
      <Card className={classes.input}>
        <form onSubmit={addUserHandler}>
          <label htmlFor="username">Username</label>
          <input
            id="username"
            type="text"
            value={enteredUsername}
            onChange={usernameChangeHandler}
            ref={nameInputRef}
          />
          <label htmlFor="age">Age (Years)</label>
          <input
            id="age"
            type="number"
            value={enteredAge}
            onChange={ageChangeHandler}
            ref={ageInputRef}
          />
          <Button type="submit">Add User</Button>
        </form>
      </Card>
    </Wrapper>
  );
};
export default AddUser;
The first time React reaches the code on the return statment of the AddUser component it will create a new object and store it in the nameInputRef variable. This object will have a property called current which will be a pointer to the input element with the id of username. This object will be stored in the nameInputRef variable and will be available for the entire lifetime of the AddUser component.
Controlled vs Uncontrolled Components
Controlled Components -Manages its own internal state and reacts to user input. The state is updated by the event handlers. The state is then passed to the input element as a value prop. The input element then displays the value of the state.
Uncontrolled Components - Use refs to interact with access DOM nodes or React elements created in the render method. They are uncontrolled because their internal state is not controlled by react. They are controlled by the DOM… we just use react refs to fetch the data from the DOM.
Effects Reducers & Context:
Effects (also known as Side Effects) - Effects are used to perform side effects in functional components. Side effects are things that happen outside of the component. For example, making an HTTP request, accessing the browser local storage, etc. Effects are triggered by changes to the component’s state or props. They are also triggered by changes to the component’s dependencies. Dependencies are values that the effect depends on. For example, if the effect depends on the value of a prop, then the effect will be triggered when the prop changes.
Reducers - Reducers are functions that take the current state and an action as arguments and return a new state result. Reducers are pure functions. They should not perform any side effects. They should not mutate the state. They should not access the DOM. They should not access global variables. They should not access the arguments object. They should not access the this keyword. They should not access the event object. They should not access the event target. They should not access the event target value. They should not access the event target checked. They should not access the event target files. They should not access the event target name. They should not access the event target type. They should not
Context - Context provides a way to pass data through the component tree without having to pass props down manually at every level. Context is primarily used when some data needs to be accessible by many components at different nesting levels. Context is designed to share data that can be considered “global” for a tree of React components, such as the current authenticated user, theme, or preferred language.
UseEffect() - useEffect() is a hook that allows us to execute code when a component is rendered for the first time or when a component is re-rendered. It is a combination of componentDidMount() and componentDidUpdate().
useEffect(() => {}, []); //useEffect() is a hook that allows us to execute some code when a component is rendered for the first time or when it is re-rendered
The following would only run once because it has no dependencies to signal for it to run again on a change in dependency
useEffect(() => {
  const loginState = localStorage.setItem("isLoggedIn", "1");
  if (loginState === "1") {
    setIsLoggedIn(true);
  }
}, []);
Removing the dependency array will cause the useEffect() to run on every render cycle.
the following code will run whenever there is a change to the enteredEmail or enteredPassword state variables or when the setFormIsValid function is called.
useEffect(() => {
  setFormIsValid(
    enteredEmail.includes("@") && enteredPassword.trim().length > 6
  );
}, [setFormIsValid, enteredEmail, enteredPassword]);
What to and what not to add as useEffect() dependencies
That is correct, but there are a few exceptions you should be aware of:
- You DON’T need to add state updating functions (as we did in the last lecture with
setFormIsValid): React guarantees that those functions never change, hence you don’t need to add them as dependencies (you could though) - You also DON’T need to add “built-in” APIs or functions like
fetch(),localStorageetc (functions and features built-into the browser and hence available globally): These browser APIs / global functions are not related to the React component render cycle and they also never change - You also DON’T need to add variables or functions you might’ve defined OUTSIDE of your components (e.g. if you create a new helper function in a separate file): Such functions or variables also are not created inside of a component function and hence changing them won’t affect your components (components won’t be re-evaluated if such variables or functions change and vice-versa)
So long story short: You must add all “things” you use in your effect function if those “things” could change because your component (or some parent component) re-rendered. That’s why variables or state defined in component functions, props or functions defined in component functions have to be added as dependencies!
Here’s a made-up dummy example to further clarify the above-mentioned scenarios:
import { useEffect, useState } from "react";
let myTimer;
const MyComponent = (props) => {
  const [timerIsActive, setTimerIsActive] = useState(false);
  const { timerDuration } = props; // using destructuring to pull out specific props values
  useEffect(() => {
    if (!timerIsActive) {
      setTimerIsActive(true);
      myTimer = setTimeout(() => {
        setTimerIsActive(false);
      }, timerDuration);
    }
  }, [timerIsActive, timerDuration]);
};
In this example:
timerIsActiveis added as a dependency because it’s component state that may change when the component changes (e.g. because the state was updated)timerDurationis added as a dependency because it’s a prop value of that component - so it may change if a parent component changes that value (causing this MyComponent component to re-render as well)setTimerIsActiveis NOT added as a dependency because it’s that exception: State updating functions could be added but don’t have to be added since React guarantees that the functions themselves never changemyTimeris NOT added as a dependency because it’s not a component-internal variable (i.e. not some state or a prop value) - it’s defined outside of the component and changing it (no matter where) wouldn’t cause the component to be re-evaluatedsetTimeoutis NOT added as a dependency because it’s a built-in API (built-into the browser) - it’s independent from React and your components, it doesn’t changeDebouncing is a technique used to improve performance by limiting the rate at which a function gets invoked. It is a common practice to improve the performance of input handlers. For example, if you have a search input field, you can debounce the onChange event handler to avoid making an API call on every keystroke. Instead, you can make the API call only after the user has stopped typing for a certain amount of time.
- useEffect() without a dependency array will run after every render cycle.
useReducer():
- Sometimes you have more complex state, for example multiple states, multiple ways of changing the state or dependencies to other states. In these cases useState() can become hard to use or error prone.
- useReducer() is a hook that allows you to manage complex state in a more predictable way. It’s a bit more complex than useState() but it’s also more powerful.
Use case for useReducer(): when you have state that belongs togther, like enteredEmail and emailIsValid, or enteredPassword and passwordIsValid, and or if you have state updates that depend on other state updates - For example:
const validateEmailHandler = () => {
  setEmailIsValid(enteredEmail.includes("@"));
};
const validatePasswordHandler = () => {
  setPasswordIsValid(enteredPassword.trim().length > 6);
};
in each of the cases above we are setting a state variable based on the value of another state variable. This is a dependency and it can lead to bugs. For example, if we have a button that triggers the validation of both the email and password, and we click the button twice, the second time the validation will be wrong because the state variables will have changed in the meantime. This is a problem that useReducer() can solve.
useReducer() Syntax
const [state, dispatchFn] = useReducer(reducerFn, initialState, initFn);
- in the above example state is the latest state snapshot used in the component render cycle. The dispatchFn is a function that dispatches an action that will be consumed by the reducerFn.
- The reducerFn is a function that is triggered automatically once an action is dispatched (via dispatchFn). The reducerFn receives the latest state snapshot and the action as arguments and returns a new state snapshot. The reducerFn is the only place where you can update the state.
reducerFn Syntax
(prevState, action) => newState;
- initFn is a function to set the initial state programatically. It is optional and it is rarely used.
Login Form with useState();
import React, { useState, useEffect, useReducer } from "react";
import Card from "../UI/Card/Card";
import classes from "./Login.module.css";
import Button from "../UI/Button/Button";
const Login = (props) => {
  const [enteredEmail, setEnteredEmail] = useState("");
  const [emailIsValid, setEmailIsValid] = useState();
  const [enteredPassword, setEnteredPassword] = useState("");
  const [passwordIsValid, setPasswordIsValid] = useState();
  const [formIsValid, setFormIsValid] = useState(false);
  useEffect(() => {
    console.log("EFFECT RUNNING");
    return () => {
      console.log("EFFECT CLEANUP");
    };
  }, []);
  useEffect(() => {
    const identifier = setTimeout(() => {
      console.log("Checking form validity!");
      setFormIsValid(
        enteredEmail.includes("@") && enteredPassword.trim().length > 6
      );
    }, 500);
    return () => {
      console.log("CLEANUP");
      clearTimeout(identifier);
    };
  }, [enteredEmail, enteredPassword]);
  const emailChangeHandler = (event) => {
    setEnteredEmail(event.target.value);
  };
  const passwordChangeHandler = (event) => {
    setEnteredPassword(event.target.value);
  };
  const validateEmailHandler = () => {
    setEmailIsValid(enteredEmail.includes("@"));
  };
  const validatePasswordHandler = () => {
    setPasswordIsValid(enteredPassword.trim().length > 6);
  };
  const submitHandler = (event) => {
    event.preventDefault();
    props.onLogin(enteredEmail, enteredPassword);
  };
  return (
    <Card className={classes.login}>
      <form onSubmit={submitHandler}>
        <div
          className={`${classes.control} ${
            emailIsValid === false ? classes.invalid : ""
          }`}
        >
          <label htmlFor="email">E-Mail</label>
          <input
            type="email"
            id="email"
            value={enteredEmail}
            onChange={emailChangeHandler}
            onBlur={validateEmailHandler}
          />
        </div>
        <div
          className={`${classes.control} ${
            passwordIsValid === false ? classes.invalid : ""
          }`}
        >
          <label htmlFor="password">Password</label>
          <input
            type="password"
            id="password"
            value={enteredPassword}
            onChange={passwordChangeHandler}
            onBlur={validatePasswordHandler}
          />
        </div>
        <div className={classes.actions}>
          <Button type="submit" className={classes.btn} disabled={!formIsValid}>
            Login
          </Button>
        </div>
      </form>
    </Card>
  );
};
export default Login;
Login Form with useReducer();
import React, { useState, useEffect, useReducer } from "react";
import Card from "../UI/Card/Card";
import classes from "./Login.module.css";
import Button from "../UI/Button/Button";
const emailReducer = (state, action) => {
  if (action.type === "USER_INPUT") {
    return { value: action.val, isValid: action.val.includes("@") };
  }
  if (action.type === "INPUT_BLUR") {
    return { value: state.value, isValid: state.value.includes("@") };
  }
  return { value: "", isValid: false };
};
const Login = (props) => {
  // const [enteredEmail, setEnteredEmail] = useState('');
  // const [emailIsValid, setEmailIsValid] = useState();
  const [enteredPassword, setEnteredPassword] = useState("");
  const [passwordIsValid, setPasswordIsValid] = useState();
  const [formIsValid, setFormIsValid] = useState(false);
  const [emailState, dispatchEmail] = useReducer(emailReducer, {
    value: "",
    isValid: null,
  });
  useEffect(() => {
    console.log("EFFECT RUNNING");
    return () => {
      console.log("EFFECT CLEANUP");
    };
  }, []);
  // useEffect(() => {
  //   const identifier = setTimeout(() => {
  //     console.log('Checking form validity!');
  //     setFormIsValid(
  //       enteredEmail.includes('@') && enteredPassword.trim().length > 6
  //     );
  //   }, 500);
  //   return () => {
  //     console.log('CLEANUP');
  //     clearTimeout(identifier);
  //   };
  // }, [enteredEmail, enteredPassword]);
  const emailChangeHandler = (event) => {
    dispatchEmail({ type: "USER_INPUT", val: event.target.value });
    setFormIsValid(
      event.target.value.includes("@") && enteredPassword.trim().length > 6
    );
  };
  const passwordChangeHandler = (event) => {
    setEnteredPassword(event.target.value);
    setFormIsValid(emailState.isValid && event.target.value.trim().length > 6);
  };
  const validateEmailHandler = () => {
    dispatchEmail({ type: "INPUT_BLUR" });
  };
  const validatePasswordHandler = () => {
    setPasswordIsValid(enteredPassword.trim().length > 6);
  };
  const submitHandler = (event) => {
    event.preventDefault();
    props.onLogin(emailState.value, enteredPassword);
  };
  return (
    <Card className={classes.login}>
      <form onSubmit={submitHandler}>
        <div
          className={`${classes.control} ${
            emailState.isValid === false ? classes.invalid : ""
          }`}
        >
          <label htmlFor="email">E-Mail</label>
          <input
            type="email"
            id="email"
            value={emailState.value}
            onChange={emailChangeHandler}
            onBlur={validateEmailHandler}
          />
        </div>
        <div
          className={`${classes.control} ${
            passwordIsValid === false ? classes.invalid : ""
          }`}
        >
          <label htmlFor="password">Password</label>
          <input
            type="password"
            id="password"
            value={enteredPassword}
            onChange={passwordChangeHandler}
            onBlur={validatePasswordHandler}
          />
        </div>
        <div className={classes.actions}>
          <Button type="submit" className={classes.btn} disabled={!formIsValid}>
            Login
          </Button>
        </div>
      </form>
    </Card>
  );
};
export default Login;
useEffect Review
useEffect(() => {
  const identifier = setTimeout(() => {
    console.log("Checking form validity!");
    setFormIsValid(
      enteredEmail.includes("@") && enteredPassword.trim().length > 6
    );
  }, 500);
  return () => {
    console.log("Cleanup");
    clearTimeout();
  };
}, [enteredEmail, enteredPassword]);
- In the above code the cleanup function (returned function) will run before the next useEffect() runs. Whenever the useEffect runs …before it runs… except for the first time that it runs, the cleanup function will run.
- In addition, the cleanup function will run whenever the compnent you use the useEffect() in is unmounted from the DOM.
- To reiterate… the cleanup function does not run before the first useEffect call.
useReducer() Review:
In the following code…
const Login = (props) => {
  const [enteredEmail, setEnteredEmail] = useState("");
  const [emailIsValid, setEmailIsValid] = useState();
  const [enteredPassword, setEnteredPassword] = useState("");
  const [passwordIsValid, setPasswordIsValid] = useState();
  const [formIsValid, setFormIsValid] = useState(false);
we can use useReducer to combine the state and the state update logic for the entered email and the emailIsValid state… as well as combining the enteredPassword and passwordIsValid state.
const [enteredEmail, setEnteredEmail] = useState("");
const [emailIsValid, setEmailIsValid] = useState();
const [enteredPassword, setEnteredPassword] = useState("");
const [passwordIsValid, setPasswordIsValid] = useState();
Adding Nested Properties As Dependencies To useEffect
Previously, we used object destructuring to add object properties as dependencies to useEffect().
const { someProperty } = someObject;
useEffect(() => {
  // code that only uses someProperty ...
}, [someProperty]);
This is a very common pattern and approach, which is why I typically use it and why I show it here (I will keep on using it throughout the course).
I just want to point out, that they key thing is NOT that we use destructuring but that we pass specific properties instead of the entire object as a dependency.
We could also write this code and it would work in the same way.
useEffect(() => {
  // code that only uses someProperty ...
}, [someObject.someProperty]);
This works just fine as well!
But you should avoid this code:
useEffect(() => {
  // code that only uses someProperty ...
}, [someObject]);
Why? …
Because now the effect function would re-run whenever ANY property of someObject changes - not just the one property (someProperty in the above example) our effect might depend on.
useState vs. useReducer:
| useState | useReducer |
|---|---|
| the main state managment tool | need more power (complex state like objects) |
| great for independent pieces of state | use if you have state that is related to other state |
| great for if state updates are simple and few |
Context API:
- to use context you need to do two things:
- Provide the context to components that need to be wrapped by it.
- Consume it (listen to it)
When to use props vs context:
- in most cases you will use props to pass data to components.
- only if you have something you would forward through a lot of components and you are doing something specific with it in a certain component, (for instance, the logout button in navigation) then you would use context.
React Context Limitations - React Context is not optimized for high frequency changes.
- React Context should not be used to replace all component communications and props… components should still be configurable via props and short prop chains might not need to be replaced with context.
Rules Of React Hooks:
- only call react hooks in react functions…(either component function or in custom hooks)
- You can only call react hooks at the top level of your component function or custom hooks. (not in loops, conditions, or nested functions)
- for useEffect: always add every variable that is used in the effect function as a dependency to the array
Fixing Form Input IDs
With the current implementation of MealItemForm, every MealItem <Input /> receives the same id, as I do the following in the code I show in the previous lecture:
<Input
  label="Amount"
  input={{
    id: "amount",
    type: "number",
    min: "1",
    max: "5",
    step: "1",
    defaultValue: "1",
  }}
/>
This works but it has two major disadvantages which are not immediately obvious (and hence unfortunately slipped through during the recordings):
- Clicking on ANY label will always select the same, first input element - even if that’s not the one belonging to the actual MeatItem
- Screenreaders won’t be able to connect labels + inputs correctly (since all labels point at the same input)
Everything shown in the videos works as shown and fixing this is optional, but since fixing this is easy, you might want to consider making the below adjustments:
One possible workaround is to accept anidprop on the MealItemForm component and use that to create a unique id per<Input />:
<Input
  label="Amount"
  input={{
    id: "amount_" + props.id, // this  changed!
    type: "number",
    min: "1",
    max: "5",
    step: "1",
    defaultValue: "1",
  }}
/>
We just have to make sure that the id props is passed correctly to <MealItemForm /> when that component is being used (i.e. inside of the MealItem component):
<MealItemForm id={props.id} />
Last but not least, for that to work, we should also pass id as a prop to MealItem, hence inside of the AvailableMeals component, we should create <MealItem /> elements like this:
<MealItem
  id={meal.id} //  this  is  new!
  key={meal.id}
  name={meal.name}
  description={meal.description}
  price={meal.price}
/>
Again, this is all 100% optional when it comes to the general functionality of this demo app - everything works as shown in the videos without these changes as well. But for proper accessibility, you should consider making these adjustments.
How we would do the modal overlay (without using the react portal):
import React from "react";
import classes from "./Modal.module.css";
const Backdrop = (props) => {
  return <div className={classes.backdrop} />;
};
const ModalOverlay = (props) => {
  <div className={classes.modal}>
    <div className={classes.content}>{props.children}</div>
  </div>;
};
const Modal = (props) => {
  return (
    <React.Fragment>
      <Backdrop />
      <ModalOverlay>{props.children}</ModalOverlay>
    </React.Fragment>
  );
};
export default Modal;
This is how we do the modal overlay with the react portal:
import React from "react";
import ReactDOM from "react-dom";
import classes from "./Modal.module.css";
const Backdrop = (props) => {
  return <div className={classes.backdrop} />;
};
const ModalOverlay = (props) => {
  <div className={classes.modal}>
    <div className={classes.content}>{props.children}</div>
  </div>;
};
const portalElement = document.getElementById("overlays");
const Modal = (props) => {
  return (
    <React.Fragment>
      {ReactDOM.createPortal(<Backdrop />, portalElement)}
      {ReactDOM.createPortal(
        <ModalOverlay>{props.children}</ModalOverlay>,
        portalElement
      )}
    </React.Fragment>
  );
};
export default Modal;
- bear in mind that in this example we added a div with the id of “overlays” in the index.html file.
How React Works Under The Hood (Optimizations)
- React does not know anything about the browser…it is just a library that is used to build user interfaces. ReactDOM is what brings actual html elements to the screen from react components… it is the interface between react and the browser(web).
                                   Context(component-wide data)
                                               ⇓
(Props…data from parent component)=======>(React Component)=======>(DOM…what the user sees)
⇑
State(internal data)
React uses a concept called the Virtual Dom which determines how the component tree (every component has a subtree) looks like and what it should look like when state changes
it should be noted that re-evaluating a component is not the same thing as re-rendering the dom.
Toggle Paragraph with useState function form vs w/o function form:
w/o function form (not recommended)
import React, { useState } from "react";
import Button from "./components/UI/Button/Button";
import "./App.css";
function App() {
  const [showParagraph, setShowParagraph] = useState(false);
  const toggleParagraphHandler = () => {
    setShowParagraph(!showParagraph);
  };
  return (
    <div className="app">
      <h1>Hi there!</h1>
      {showParagraph && <p>This is new!</p>}
      <Button onClick={toggleParagraphHandler}>Toggle Paragraph!</Button>
    </div>
  );
}
export default App;
with function form (recommended)
import React, { useState } from "react";
import Button from "./components/UI/Button/Button";
import "./App.css";
function App() {
  const [showParagraph, setShowParagraph] = useState(false);
  const toggleParagraphHandler = () => {
    setShowParagraph((prevShowParagraph) => !prevShowParagraph);
  };
  return (
    <div className="app">
      <h1>Hi there!</h1>
      {showParagraph && <p>This is new!</p>}
      <Button onClick={toggleParagraphHandler}>Toggle Paragraph!</Button>
    </div>
  );
}
export default App;
The component that has state or context that changes will be re-evaluated and possibly re-rendered whenever state changes
The exicution of a parent component will trigger the re-evaluation of all of its child components… if the state and props going to the child component do not change this will not trigger a change in the DOM
React.memo()
import React from "react";
import MyParagraph from "./MyParagraph";
const DemoOutput = (props) => {
  console.log("DemoOutput RUNNING");
  return <MyParagraph>{props.show ? "This is new!" : ""}</MyParagraph>;
};
export default React.memo(DemoOutput);
- React.memo() is a higher order function that takes a component as an argument and returns a new component that is wrapped in a memoization function.
- In the example above React.memo tells react for the DemoOutput component to only re-evaluate if the props change.
- The reason we don’t use React.memo on every single component is because it comes with a performance cost.
- It needs to store the previous prop values and compare them to the new prop values to determine if the component should be re-evaluated.
- You’re weighing the performance cost of re-evaluating the component vs the performance cost of storing the previous prop values and comparing them to the new prop values which depends on the component and how much data it is storing and how often it is re-evaluated.
- React.memo() is a good tool when you have a large component tree and you are higher up in the component tree and want to prevent unnecessary re-evaluations of components that are lower down in the component tree.
notes on primatives vs reference types:
When to use React.callback() vs React.memo()
- when we want to memoize props that are functions objects or arrays (i.e. reference types)
State Scheduling & Batching
- when you call a state updating function i.e.
setSomething('new state value'')react will not immediately update the state and re-evaluate the component tree… Instead it will schedule a state update with the provided data.
Talking to a Database via HTTP:
for this section we will be using the Star Wars API: https://swapi.dev/
- starwars api
API stands for Application Programming Interface. It is a set of rules that allow two software programs to communicate with each other. An API is a set of functions and procedures that allow the creation of applications that access the features or data of an operating system, application, or other service.
Builtin Fetch API:
function fetchMoviesHandler() {
  fetch("https://swapi.dev/api/films/", {
    method: "GET",
  });
}
- fetch returns a promise which allows us to respond to the response of the request or any errors that might occur if the request fails.
Custom Hooks:
- Custom hooks are regular functions which can contain stateful logic
- They are used to outsource stateful logic into reusable functions
- Unlike regular functions custom hooks can use other react hooks & react state.
Rules of Hooks:
1.) Only call React Hooks in React Functions
- React component functions
- React custom hooks
2.) Only call React Hooks at the top level - Don’t call hooks inside loops, conditions, or nested functions
- Don’t call them inside any block statment
3.) For useEffect() always add everything you refer to inside useEffect as a dependency.
Rules of Custom Hooks:
1.) Custom hooks must start with the word “use”
i.e.
import { useState, useEffect } from "react";
const useCounter = () => {
  const [counter, setCounter] = useState(0);
  useEffect(() => {
    const interval = setInterval(() => {
      setCounter((prevCounter) => prevCounter + 1);
    }, 1000);
    return () => clearInterval(interval);
  }, []);
  return counter;
};
export default useCounter;
Applied:
import useCounter from "../hooks/use-counter";
import Card from "./Card";
const ForwardCounter = () => {
  const counter = useCounter();
  return <Card>{counter}</Card>;
};
export default ForwardCounter;
Working with Forms & User Input:
Redux
Redux is a state managment system for cross component or app-wide state
We have 3 main kinds of State:
- Local State (state that is managed by a single component) i.e. listening to user input in a imput field; toggling a “show more” details field
- Cross-Component State (state that affects multiple components) i.e. open/closed state of a modal overlay… clicking on another component may open that overlay… requires prop drilling or context
- App-wide State (state that affects practically all components of an app) i.e. user authentication, user preferences, shopping cart, etc… done with react context or Redux
Why use Redux if we have React Context?
Disadvantages of React Context:
- Complex setup/managment (i.e. multiple nested context provider components)
- Not great for high frequency state updates (redux is better for flux-like state propagation)
Core Redux Concepts
Central Data (state) Store
- The central data store is the single source of truth for the entire application
- To access the state in the central sotre components subscribe to it
- components never directly modify the state in the central store
- we use a reducer function that mutates the stored data (not useReducer() hook)
- Components trigger or dispatch actions that are handled by the reducer function (actions describe what should be done but do not do it directly)
- Redux forwards actions to the reducer function and the reducer function returns a new state
- Once state is updated sucribing components are notified of the change in state.
Advanced Redux
Reducers must be pure, side-effect free, synchronous functions
input (old state + action) -> output (new state)
This is the same way the useReducer() hook works
Where should side effects and async tasks be exicuted? > Inside the components (e.g. useEffect()) OR Inside the action creators (e.g. redux-thunk)
To acess store in component
- import { useSelector } from “react-redux”;
- Use useSelector to access the store state…
const Cart = ( props ) => {
    const cartItems = useSelector((state) => state.cart.items);
- Translate properties in redux state to props in component
{
  cartItems.map((item) => (
    <CartItem
      item={{
        title: item.title,
        quantity: item.quantity,
        total: item.totalPrice,
        price: item.price,
      }}
    />
  ));
}
Note: reducers cannot handle side effects or async tasks
What is a Thunk?
A thunk is a function that wraps an expression to delay its evaluation.
Thunks are typically used to delay the evaluation of an expression until its results are needed, such as the dispatching of an action, or the calculation of derived data.
It is an action creator function that does not return the action it’s self but another function which eventually returns the action
React Router
When building complex user interfaces we typically build single page applications (only one initial html request & response)
absolute path: starts with a forward slash (i.e. /products) and follows the domain name (i.e. https://mydomain.com/products)
relative path: starts with a dot (i.e. ./products) and follows the current path (i.e. https://mydomain.com/products/123)
import classes from "./NewsletterSignup.module.css";
import { useFetcher } from "react-router-dom";
function NewsletterSignup() {
    const fetcher = useFetcher();

    return (
      /*Fetcher.Form will still trigger an action without initializing a route transition  */
    <fetcher.Form method="post" action="/newsletter" className={classes.newsletter}>
      <input
        type="email"
        placeholder="Sign up for newsletter..."
        aria-label="Sign up for newsletter"
      />
      <button>Sign up</button>
    </fetcher.Form>
  );
}

export default NewsletterSignup;
In the code above useFetcher is the hook you should use if you want to trigger an action or loader without navigating to a different route"
Authentication
How Authentication Works
- authentication is needed if content should not be accessed by everyone
- The client or browser sends a request to the server with user credentials
- If the credentials are valid the server sends back a token
- We can use server side sessions or authentication tokens to authenticate users
- Server side sessions (not popular in react) stores unique identifier on server and sends it to the client… then the client sends the identifier back to the server on every request
- Authentication tokens are more popular in react… the server creates and sends (but does not store)a token to the client which the client sends back to the server on every request
Query Parameters
- Query parameters are appended to the url after a question mark